Can't have Halloween without the costumes! With only a week left before the day, I figured I had better get on the ball and get them done. We went pretty simple and inexpensive this year. As much as I love making a big production out of things and wouldn't mind spending hours sewing an elaborate costume (especially with my Mom in town to help!), we all have to pick and choose where to spend our time and money. So we're going with quick and easy on the costumes this year. Nothing wrong with that, right?
Dressing up is not somthing I enjoy, personally, but the kids love it when I join in so the last couple of years I put on an embellished witch hat for trick or treating. Kaitlyn decided she wanted to be "twin witches" this year. Lucky me!
We were able to find a fun sequin skirt in her dress up clothes and she had a black shirt that I added a witch silhouette to (how great that we found some matching sequin material at Hobby Lobby!). Add a $2 witch hat with some fun embellishments and we're done!
 Kate wasn't too enthused about wearing the dress up skirt until I pointed out that it had a matching doll size outfit, so Hello Kitty could dress up with us. I made HK a little hat out of felt and now Kaitlyn is SO excited for Trick or Treating.
Now Tyler, all he can talk about is Monster Trucks so it's almost expected that he requested to dress up as a Monster Truck Driver. I just happened to find a suitable jumpsuit at a children's consignment sale a couple of weeks ago - score! It was a couple sizes too large but it was easy to hem up the pants and roll up the sleeves.

I found the helmet in the dollar section at Target. It said POLICE on the side so I printed off some monster truck clipart (Big Foot is Ty's absolute favorite monster truck - no idea why) on a sticky address label and now it's a monster truck helmet. And to pull it all together I added a couple more sticky labels to the jumpsuit.


I found the helmet in the dollar section at Target. It said POLICE on the side so I printed off some monster truck clipart (Big Foot is Ty's absolute favorite monster truck - no idea why) on a sticky address label and now it's a monster truck helmet. And to pull it all together I added a couple more sticky labels to the jumpsuit.

And now we're ready for Halloween! Can't wait to see the kids all dressed up!
What are your kids going to be wearing? Do you dress up for Halloween?


 (I'm taking a break from my 31 days series because I really want to post this tutorial!)
 I didn't want the legs to just droop lifelessly, so I hot glued a wire to the center of the boot

 Then I stuffed the boot with a little bit of cotton batting.
 Then closed up the top opening of the the boot with the hot glue.
 The hat is made out of cereal boxes. I cut one into a half circle for the hat brim (I didn't want a full circle because I wanted the hat to sit more flat once it was attached to the wreath), and formed a cone with a second cereal box. Then spray painted both of them black.
 To make it even more "realistic" I cut a jagged piece out of some scrap black satin, to use for the witch's skirt.
 Now with all the pieces prepped, it was time to put it together. I used the wire to attach the legs to the bottom of the wreath form then used the hot glue to add the skirt fabric.
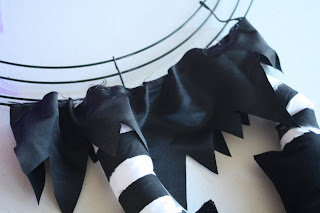 I used small pieces of floral wire (about 5" long. You will need to clip the ends off after you attache the tulle, but it's easier to work with if the wire is a bit longer) to attach the tulle to the frame, making little poufs with the fabric as I went.

 See, now the wreath is really taking shape.
 As it turns out, the tulle I had wasn't quite enough to make it really pouffy and cover all the wire (I'd get 5 yards next time which would give me 10 yards total to work with next time). So I took some coordinating fabric and wrapped the wreath frame.
 The only left to do was add the embellishments. On went a little sign (just a small piece of wood painted black with vinyl lettering for the quote), some flowers, a little ribbon and polka dot fabric strips.
 Some more ribbon as laces on her boots.