Menu buttons


Thursday, March 20, 2014

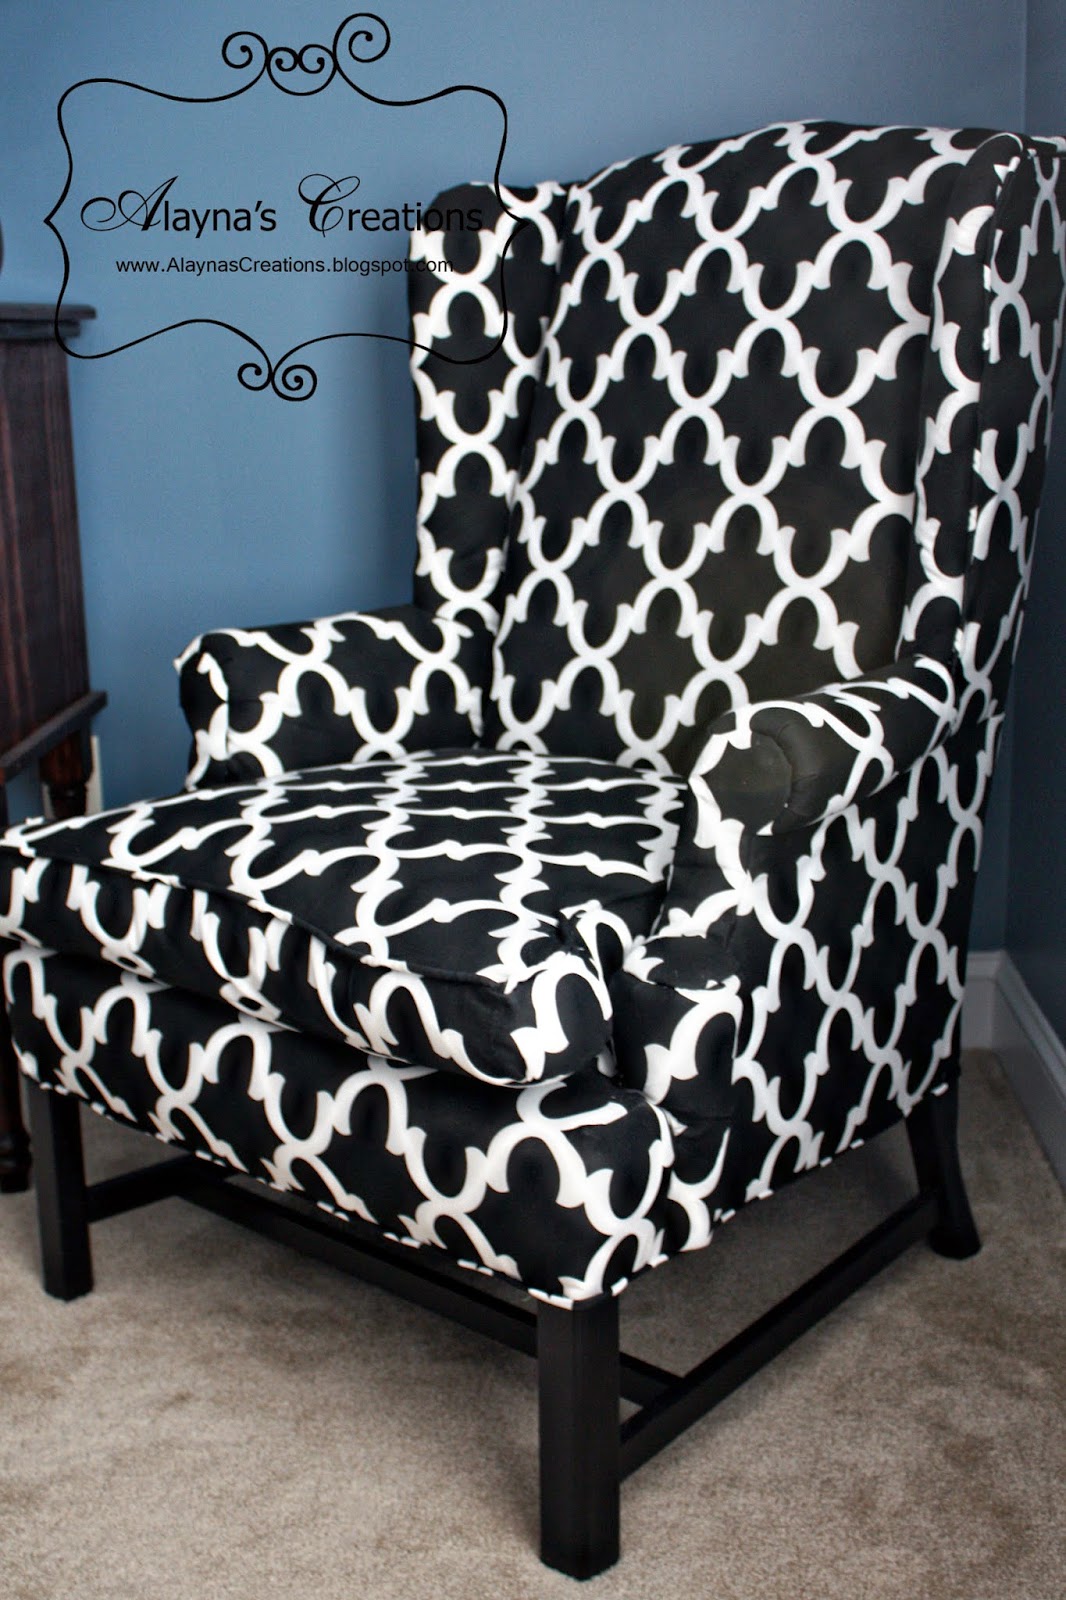
Wingback Chair Redo

I did it!  I did it!  I finally tackled my first reupholstery project and woohoo!  Success!
 I picked up this lovely chair last year (yes a whole year ago, urgh) on a shopping trip with a friend at a Habitat for Humanity Resale Store.  We completely filled the back of the SUV on that trip ahaha - more on that part later. 
This chair in particular cost a whopping $5.  Yup.  FIVE DOLLARS!  I figured at that price even if I messed it up I wouldn't feel too bad.  And it obviously needed a little TLC.
Then I started pricing upholstery fabric - yikes!  I mean, it wasn't exactly a surprise because back when I was doing design it wasn't unusual to order $125/yard fabrics for custom chairs.  But that doesn't work for my budget.  I eventually found a small discount fabric place not far from my home, but after a couple trips at different times I still hadn't found anything I loved and most were still upwards of $12/yd.  Luckily I stumbled onto a link to fabrics.com and found some great deals.  The fabric arrived a little over a week ago and it was finally time to tackle the chair.
I did a quick review of a tutorial I had found on a blog, then grabbed the pliers and dove in.

 My trusty sidekick helpfully had her nose in on the fun most of the time.

Do you know how many thousands of staples they put in one chair?  Me either but it's a LOT.  I gave my hand a break every hour or so of work in the hope that I wouldn't get blisters (I didn't!).  And eventually I had it all torn apart.
Then I happily took a trip to the craft store to get more batting, upholstery tacks, and cording to sew the piping.  And it wasn't that long (parts of two days' work) before I had it all finished!  The husband was actually pretty impressed.  He didn't think I would actually finish the project, let alone end up with a decent-looking chair.  He should know better than to doubt me, right? ;)  (He didn't admit any of this until after the chair was all put together and he had sufficiently praised my efforts lol.  So I forgave him.)

 Look!  It even looks good close up! ;)  And yes, I painted the base black before putting the fabric on.  I almost forgot to do that part LOL.  Some of my other tips? 
-Take lots and lots of photos as you pull the old fabric off.  It really helps to be able to go back and see the process in reverse, or look at a few details on how to attach the tricky pieces.
-Carefully label (number it when removed, where it went, and which side is the top!) and set aside each piece of old fabric as you remove it.  Not only will you be able to use them as patterns to cut out the new fabric, but you can also refer back to them when you are assembling the chair.
-Take your time!   This is a labor-intensive process and it takes its toll on your hands and your patience.  When my hands were cramping up or I found myself annoyed or ready to rush through a step I would stop for a few hours or the rest of the day.  The last thing I wanted was to "mess it up" and then have to see my blunder every time I looked at the chair.  So take your time and do it right (or fix it right then) as you go.
 The chair now happily resides in our bedroom.  I'm this close to having the bedroom completely pulled together.  I'll share that soon.
But for now, I'm going to enjoy the chair.

Wednesday, March 12, 2014

Decluttering, Shall We?

I open up my storage closets and what do I find?
 Yup, a big giant mess.  In BOTH of my upstairs storage closets.  Couldn't even walk into them, forget about finding anything.  For a couple of months now I had just been tossing things in there when I didn't know what else to do with them and sure enough, pretty soon they were both one big giant disaster.
One day, not that long ago, we realized Kaitlyn had hit a growth spurt and needed to go out shopping for new jeans.  She and I took a Saturday morning and had a blast - basically doing a second round of back to school shopping for the year.  If only the growth spurt could have waited for the summer season when we would have needed to re-outfit her anyway.  But it didn't, so shopping we went.  Then we came home and sorted through all her clothes and bagged up everything that was too small.  The very next day I was talking with a neighbor about how quickly our kids are growing and realized that both of her daughters are in the size the my Kate just grew out of - perfect!  So I went to the closet and pulled out not only the bags we had just set aside, but I started finding clothes I had previously been tossing in there here and there as they were outgrown.
Pretty soon I was pulling out everything in not only that closet but the second storage closet as well (they flank each side of the guest room and all are accessed through the playroom) and pretty soon the playroom looked like this.
 Yup.  The kids came home to find a complete disaster area.  In among homework, dinner, and the rest of the evening routine I found the time to sort through everything.
That same storage closet now looks like this:
 Look!  You can see the floor!
And the wall on the other side of the closet:
 Yes, that would be half of my wreath collection.  Originally I had purchased some of those wreath holder boxes, but my wreaths were too fluffy or too oddly shaped to fit in them.  So they all hang on the wall.
Here are the rest:
in storage closet #2
which also now has some clear floor space - yay!  Sure, it's not worthy of the Pottery Barn catalog or anything, but it's a lot better than it was.  In the process I also "discovered" a lot of things that I had forgotten I had, like an entire stack of photos I had blown up but never put up on the wall.  (Now you know what prompted me to get started on Tyler's Monogram Wall again, along with the photos in my bedroom and other things I have yet to post)  It was a bit like Christmas all over again ;)  It also got the motivation going to not only tackle some of the projects that have been waiting for attention for a very long time, but to see what else I needed to sort through to make my life easier.  And it was perfect timing when just a few days later a friend sent me the link to the 40 Bags in 40 Days challenge.

Of course I jumped right on board.  Within about 10 minutes the next morning (while waiting at the bus stop, no less) I had a list of more than 40 locations that could use a little TLC.  A lot of them are tech-related (like cleaning out my email inboxes and organizing/backing up photos) and most should take less than 30 minutes to tackle, which should make it easy to fit into the day.  Yesterday was day 7 for me (I counted the storage closet sort as the first two tasks lol.  It makes me feel like I got off to a good start) and so far so good.

Anyone else doing the 40 Bags in 40 Days Challenge?  Or want to join me now that you've heard about it? ;)

Saturday, March 8, 2014

Up on the Wall

 Remember this?  Well, I got it up on the wall!  (See Dari?! It didn't take 6 months! lol)
Where?  In the master bedroom, of course.  On that big blank wall by the bathroom.
 
I found I already had some photos printed, so I was able to make a nice little grouping on the wall.
PS - the hangers on the back of those frames drove my husband nuts when hanging them.  Not only are they each not quite placed in the same spot in the back, but the little hooks flip up and down so it was a real pain trying to get them on the wall.  We ended up with our faces pressed against the wall and a flashlight trying to see behind it to make sure we caught the hooks right.  I think it took us as long to hang these as it did to do the entire monogram photo wall in Tyler's room.
I'm starting to get excited about this room coming together.  I can count on one hand the number of projects I still want to do in the room - yay!  Next up is reupholstering a chair.  The fabric I ordered for it arrived the day before yesterday.  EEEEK!

Friday, March 7, 2014

One Little Word for March

Well we're a full week into March and I'm pretty proud of myself for jumping right into my One Little Word prompts for the month.  I've found that I look forward to the first of the month and the opportunity to explore my word and my goals in a different way. 

I'm wondering if I need bigger cards for the reflections lol.  These are only baseball card sized and I'm finding myself struggling to put everything down in the small space.  But maybe that's a good thing - makes me focus and pare it down to just the important parts.
 
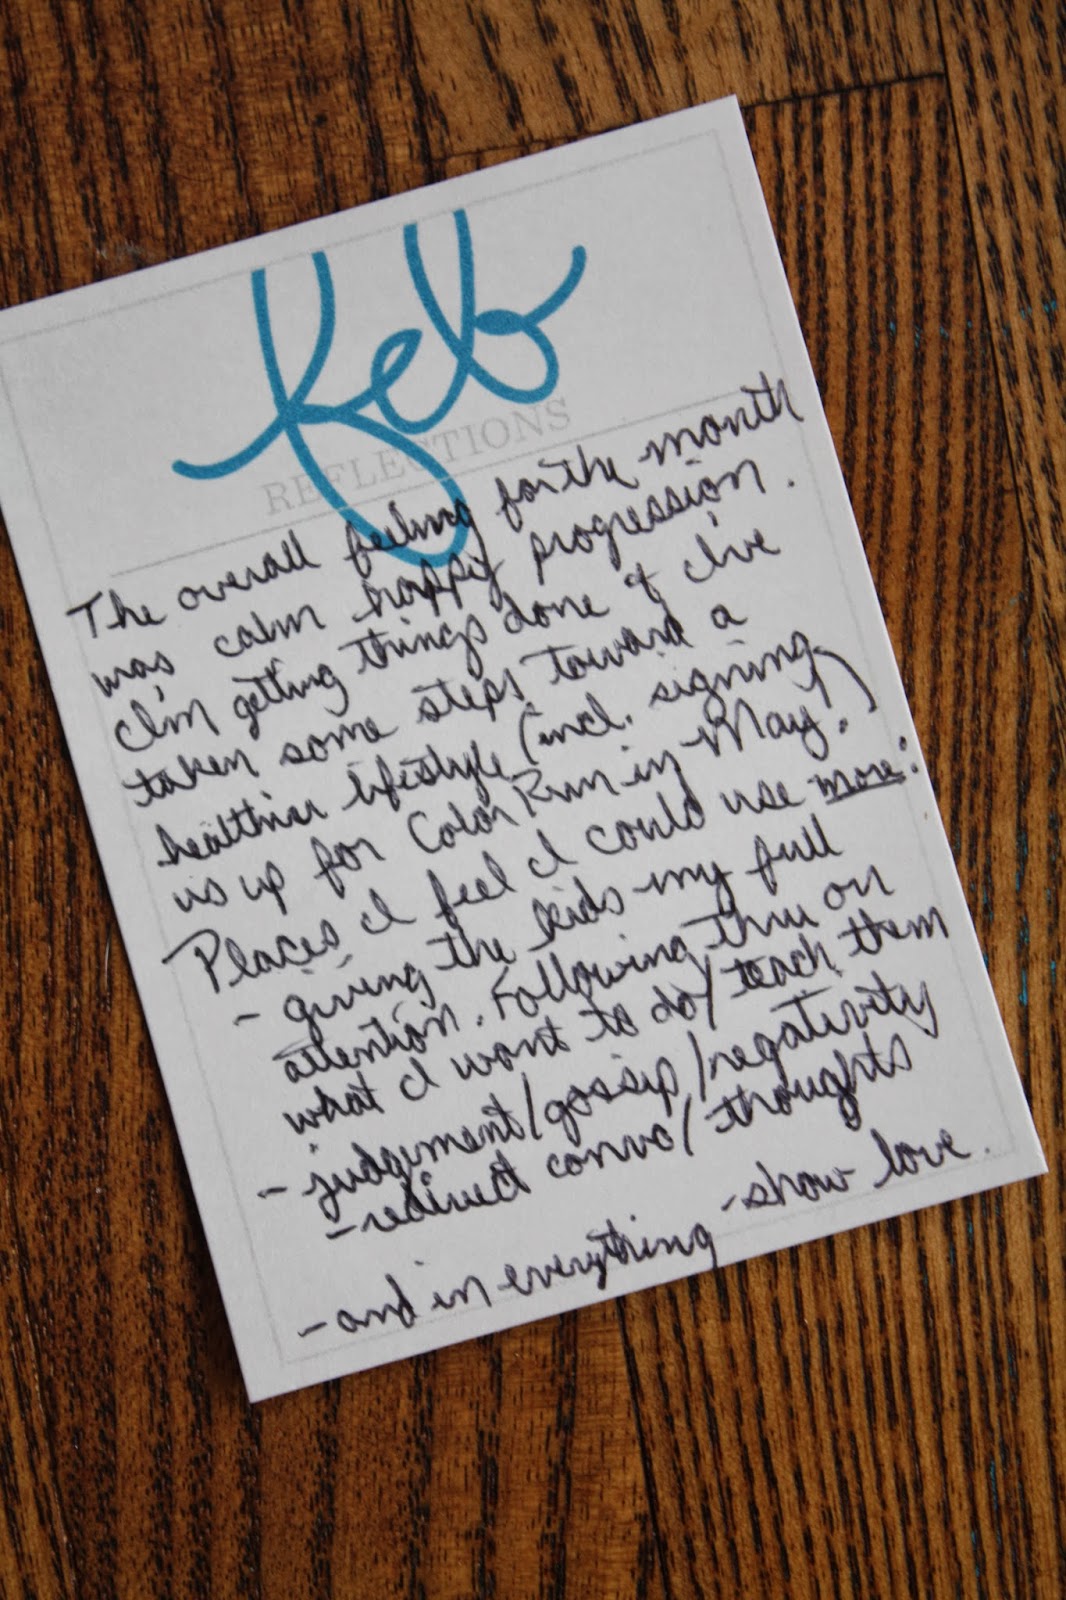
My reflections for February read: 
The overall feeling for the month was calm happy progression.  I'm getting things done and I've taken some steps toward a healthier lifestyle (including signing us up for the Color Run in May!).  Places I feel I could use more:
-giving the kids my full attention.  Following thru on what I want to do/teach them
-judgment/gossip/negativity.  redirect convo/thoughts
-and in everything - show love.
 
The "assignment" for March was to make a vision board.  It didn't necessarily have to be about or include my Word, just things that call to me.  And I have to admit, it's not really my "thing" to create like this.  I love words and I love making things, but the collage-type look isn't my style.  Once I found some magazines (thanks Jeannette!) and started clipping it actually came together pretty quickly.
 I know a lot of people in the group plan on displaying their boards somewhere in their home but I don't have an appropriate space for that right now (my focus is on getting photos out and displayed - more on that tomorrow!) so I designed mine as a two page layout for my OLW album.  I really tried to keep it simple.  Just paper and a glue stick.  Sure, the big pieces ended up bubbling a little bit, but I'm ok with that.
 I think the big Intention (it's vinyl) was what it needed to pull it together.

 
 find your healthy happy mom place
 I used mostly titles cut from magazines but I did pull in a couple of quotes I had printed from Pinterest like this one from Nike and the quote pictured at the beginning of this post.
 And there it is all happily a part of my OLW album.  Right now the back side of the first page is blank so I'll probably end up printing up another quote on full size paper and adding it in there later.
We'll see.  The whole point of this project for me is to let it evolve as I go along.  My plan for the rest of the month is to spend some more time journaling and putting into practice more of my intentions...

Thursday, March 6, 2014

Bring on the Green

How many days 'til St. Patrick's day?  Around 10?  Yeah, I've been thinking about it.  I've been gathering a few ideas for things like lunchbox jokes and leprechaun pranks.  In fact I even let Kaitlyn pick out shirts for herself and her brother when we were out shopping the weekend before last.  But it's not usually something I decorate for.  However, with so many cute ideas out there I decided I wanted to create at least a couple small things before the holiday was over.  So I invited a friend over last Friday and we got a little crafty.
 First up - 2x4 Leprechaun Hats.  Pretty simple right?  And basically free.  I already had the scrap wood, the paint, the ribbon, and the shamrock was from a few floral pics I had grabbed to use on my front door wreath.
 
 I went a slightly different direction for the front door than my typical wreath.  This time around I cut a Leprechaun Hat shape out of scrap bead board.  I didn't even have to paint it, just sanded down the edges a bit.  Then added the ribbon hat band, the Luck medallion and the cute little owl (all the glittery stuff was at AC Moore a few weeks back).

I had bought also picked up a little package of tiny glitter hats that I hat originally planned to use on a wreath.  I didn't want such tiny cuteness to go to waste so I turned one of them into a hair bow for Miss Kate by adding some feathers and a gold bow.

 And my last little project was this fun You are My Pot of Gold sign.  I have a small stack of wood cut into 12x12 squares (originally intended for craft show items until I found out I wasn't cut out to do the craft show circuit) so I grabbed one of those and painted the edges white.  If I had wanted to take more time I would have stained it, but I didn't want to wait overnight for the stain to dry.  I grabbed some green scrapbook paper from my stash (I have to say, it's really nice to have a big stockpile of craft supplies.  I don't know how I'd manage to pull together "quick crafts" without it), cut vinyl for the lettering and viola!
I thought the Pot of Gold sign needed a sidekick and I've had this frame sitting around empty.  So I grabbed a spare photo.  It just happens to be some extras from last year's Christmas cards.  I'll try to remember to take a cute photo of the kids to print out for next year but for now, it works (again with one of my new mantras Done is Better Than Perfect, right?)
 
Now I just need to put away the Valentines décor and find these guys a home on the shelf by the stairs.

Sunday, March 2, 2014

Tyler's Monogram Wall

I finished it!!  Tyler's Monogram wall, which has been in the works since I did Kaitlyn's wall shortly after we moved in (3 years ago!), is finally DONE!

This is what his room looked like yesterday morning:
 And after the husband so nicely helped me hang everything up (without one swear word! A couple of eye rolls, yes, but no swear words lol  I point this out only because he had just spent some time wresting with hanging other photos in our bedroom and they weren't exactly cooperative.  I might be banned from buying frames with that type of hanger ever again.):


I'm so excited to have this one on the wall.  I put it together a couple of years ago and Tyler was not happy when he found out I had glued the cars on there and he could never have them back.  Didn't matter that he never played with those particular cars ;)  I'm pretty happy with the overall car theme for the room - kind of subtle so it doesn't scream CARS and not too toddler-esque so hopefully it will last him a few years.  But with enough bits here and there to be fun and personalized.  Look! I even managed to match the colors of the bedspread with most of the photos (that wasn't exactly intentional lol).

When we showed Tyler the finished wall last night he looked at it for a minute with no expression then as he started looking closely at it he got pretty excited.  I'm very happy with it and also very happy to cross another project off the list that has been on there for so long.  I'm feeling very productive lately.  You'll see what I mean as soon as I get the chance to work on a few more blog posts (and a few of the bigger things I am realizing I never got posted - like Tyler's birthday party from December!).  For now, one last look at the wall while I breath a sigh of relief to have it not only finished, but shared with everyone in Blogland (or at least the few friends that I know of that consistently read my blog).

Linking to:
Link Party Palooza
The Party Bunch Linky Party
Kelly's Korner