Menu buttons


Friday, May 30, 2014

My Little Entrepreneur

 My daughter loves those stretchy band loom things.  Loves them.  Loves the process of creating, experimenting with different color combinations, trying new patterns (she was quick to figure out how to YouTube tutorials by herself) and making up new designs of her own.  She discovered very quickly, as all crafters do, that there are only so many things you can make for yourself.  And as all crafters do, she started giving her creations away as gifts.
She made a lot of things for family members for Christmas, including a gift for my mom.  And my mom, being a very enthusiastic and encouraging Grandma, wore her creations to work where the middle school students she works with were quick to admire them.  Before I knew it, Grandma was taking "orders" (I'm pretty sure she is buying them herself and giving them to the kids as rewards but I'm making a point to stand back and let Kaitlyn handle all the details on her own) and emailing them to Kaitlyn, who then made a list (haha) and got to work.
 I wonder...is it learned or does it come to her naturally? ;)  Or maybe a bit of both?
She had quite a few bracelets ready to send off with Grandma's gift for Mother's Day.  And me being, well me, I asked her if she wanted to make some tags to attach them to before sending them out.  You should have seen her face light up at the idea of making her own logo.  She immediately told me she wanted a flower on it so I Googled some flower clip art and she chose one.  It was a simple matter of letting her chose a font and inserting the "designs by Kaitlyn" wording into the center before printing a bunch out on card stock.
 Turned out cute, right?  I think she has a talent for this.

 I had to push her a bit to get her to finish up the rest of the list in time to send them out before school was finished, but she did it!
Her first foray into the business world.  I can see her as CEO of some big company somewhere, can't you? ;)

Wednesday, May 21, 2014

Surprises for the End of the School Year

**Reposted on my new blog, along with a few more fun variations of the Summer Fun in a Cup end of the year gift for teachers.  Check it out here!

Who is ready for summer?!  Last night at our first outing to our neighborhood pool for the year I was reminded again how much fun summer can be and started to get excited for those long hot days around the pool.
 I know a lot of schools are getting out next week - lucky.  My kids still have almost an entire month left but in the spirit of getting things done while I'm thinking about it (and if you're on Pinterest right now, how could not NOT be thinking about it? ;)  I see pins for teacher gifts ideas daily) I whipped up some End of the Year gifts for my kids' teachers yesterday.
 I started out with a trip to the dollar store and collected the makings for a little Summer Fun kit - daiquiri glasses, sunscreen, drink mixes, italian ice freezer pops, and qourmet-esqe chocolates.  (they're red velvet and yes I snuck one to try...yum)
 I topped them off with a cute tag, (found the inspiration and printable tag here)  a fun paper straw, and a tiny drink umbrella.
One, two, three, four - done!  The hardest part was finding the cute little umbrellas - I searched 4 or 5 stores before finally finding them at a dollar store in a different town from the one where I had found everything else.  I'm sure a party store would have had them, but I haven't been anywhere near one of those in the last couple of weeks.


While I was at it, I picked up a couple of little surprises for the kids and tied them together with some curly ribbon. I also did a quick google search for the clipart then just printed it out onto cardstock for a quick and easy tent sign.  They are now packed into a grocery bag and hidden under my craft table where I will hopefully remember to pull them out to surprise the kids with on the last day of school.

When do your kids get out of school?  Do you have any fun plans for the last day of school or vacation plans for this summer?

Monday, May 19, 2014

Pantry Re-do

Organization and reorganization - we just can't get away from it, can we?  Or maybe that's just me... 
No I'm pretty sure it's everyone ;)  When I get the chance I've been working my way down the list of places that needed decluttering that I made for the 40 Bags in 40 Days Challenge (note to self - I need to post an update on that.  The official 40 days were over a few weeks ago lol).  Yesterday I had some time to waste before heading to my daughter's dance recital and I didn't want to get started on anything big, so I decided to finally add the labels to the containers in the pantry.  
I said that word again, didn't I?  Finally.  I've had those letters cut out (vinyl lettering using the silhouette) and sitting here for weeks now.  And the pantry itself?  We put shelves in it and repainted it, oh, a year and a half ago.  I don't suppose I will ever catch up completely or totally finish the projects on my list.  And I'm ok with that.  I'm ok that it takes a while to get things done, and even longer to share them on the blog.  At least things are getting done, and progress of any sort is really the goal.  That, and having a life outside of the To Do List, which is really what life is about right?
So before another one of the kids comes downstairs needing something or the dog insists on going outside and I get interrupted again, let me share my pantry photos.
This is the Before:
The biggest issue was the wire shelving, of course.  I'm probably a closet snob now that my husband is so good with installing built-ins.  I can't stand the wire stuff anymore.  So it had to go.  As did that metal post right in the middle of the closet.  It was always getting in the way.

And let's not forget the overall clutter. 
So I emptied it all out and stacked it in the sun room - can you believe ALL that was in that one closet?! - and turned the husband loose on the shelving.
Did I mention the closet re-do was what told him I wanted for my birthday that year?  Yep.  And I painted it myself too - happy DIY birthday! ;)
At the time I had been seeing a lot of fun walls in pantries and I wanted to do something unique and fun but without putting a lot of extra time into it.  What I ended up with was a series of stripes using leftover paint from the rest of the house.
Then I was all set to load everything back in.  I started off being methodical about it.  I put the seldom-used stuff in the back two corners and assigned specific shelves to certain types of food - baking, cereal, snacks, etc.  Then I realized I was having Kaitlyn's party that weekend and needed the sunroom and I shoved the rest of it in there willy nilly.
A few months later my friend Audrey came to visit and insisted on helping me finish organizing it one afternoon.  Everything got completely sorted, categorized, tossed (if expired or didn't look like I would ever use it), and reshelved.  And that was the point it has been in for quite some time - functional but not quite fully finished enough to take final photos.
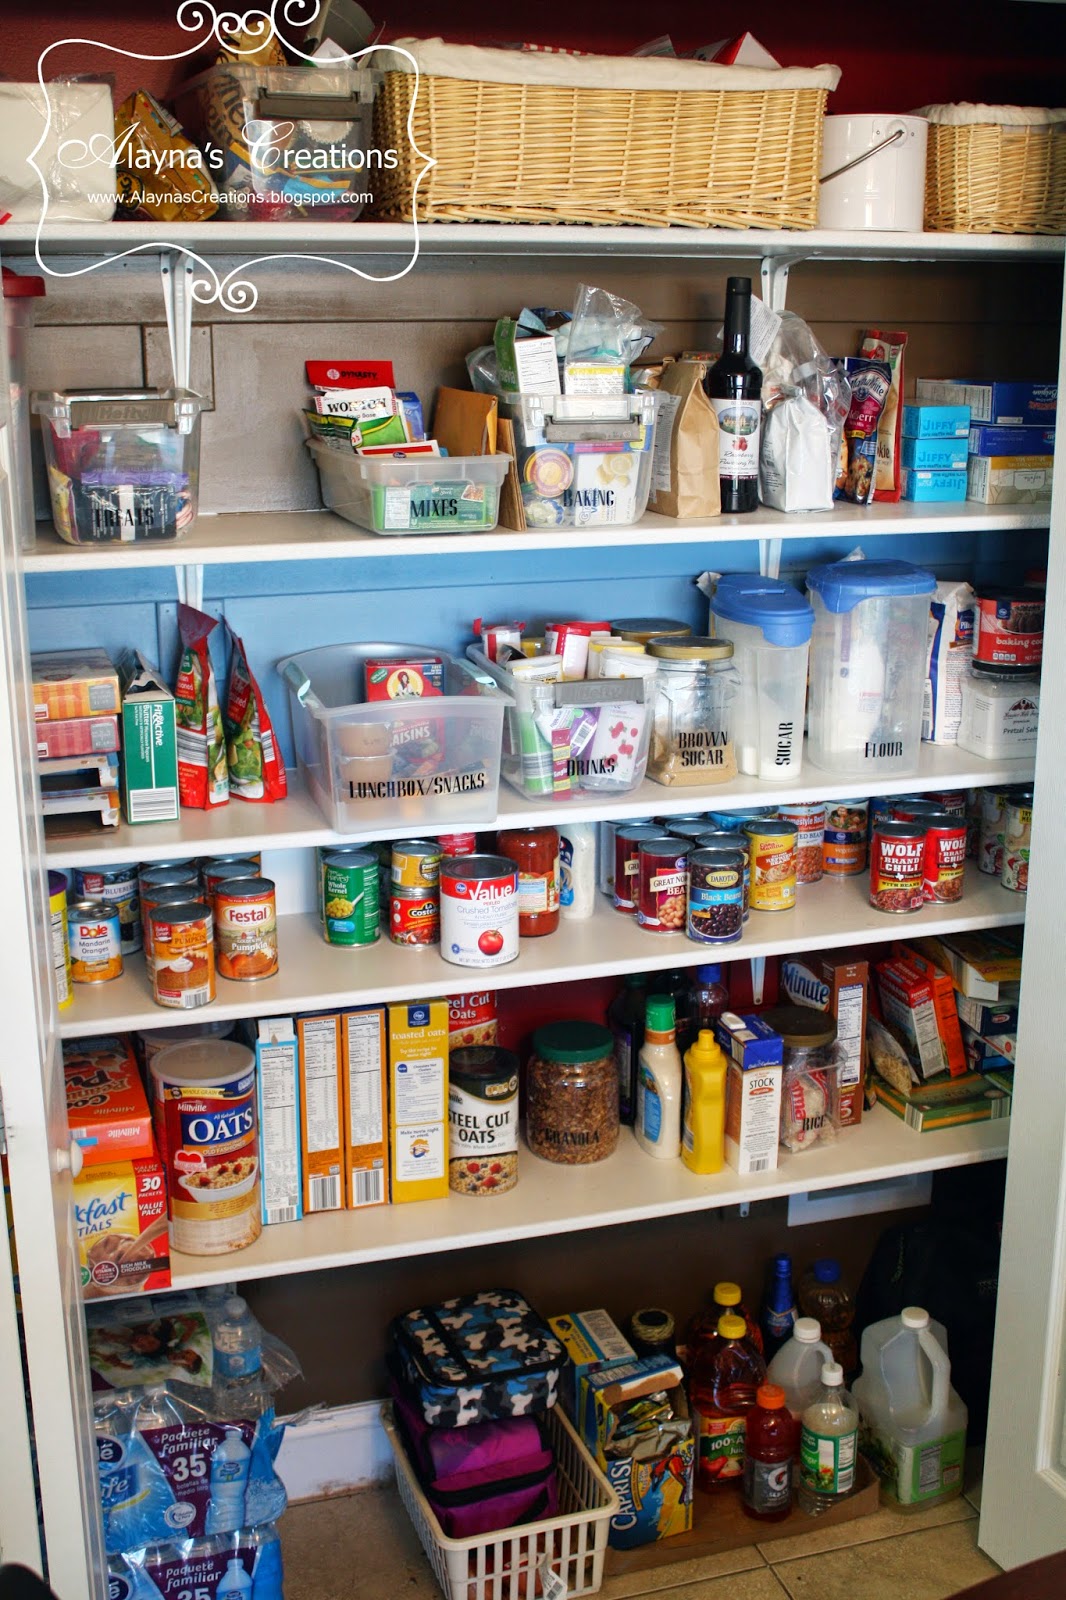
 Until yesterday.  WOOHOO!  Labels are on and the pantry is finished!
 For the containers themselves I tried to work mostly with what I had already.  The sugar and flour were some I've had forever and after going back and forth and looking at all the fun and pretty containers available in many different stores I decided to stick with clear plastic ones.  That way I can just rinse them out if anything spills and we can easily see what's inside, even without the labels.  The jars for the brown sugar, powdered sugar, rice, granola, etc are actually containers that used to hold nuts.
 I purposely had my husband build that one shelf shorter just for cans.  It's working really well for us and freed up enough space that we could fit in one more shelf than had originally been able to fit.
I want to pick up a few of those under-shelf baskets the next time I'm at Ikea for potatoes, onions, and maybe those lunchboxes.  (There's always something on the list isn't there?)

I made sure when I was organizing everything that the things the kids need to access themselves were within easy reach (cereal, snacks, lunchbox stuff, drinks) and things like chips and candy were kept up out of easy reach.  The top shelf also holds things we use for entertaining.  That white bucket with the handle is a divided container that holds plastic utensils and napkins and I always keep it stocked and ready to pull out.  The other baskets hold napkins, paper plates, straws, cupcake wrappers, etc.

And there we have it.  It's not quite Pottery Barn catalog perfect, but it looks good and it's functional.

Sunday, May 18, 2014

One Little Word - May Prompt (I am)

Thought it was time to share my One Little Word prompts for this month.  After such a crazy April I surprised myself by getting to these within the first couple days of May.  I guess what I really needed was to take the time to breath, get grounded and back in balance inside my head.
My reflections for April:
It says:  "Breathing a sigh of relief.  April was too much - work, responsibilities, Spring To Do lists, etc - all hit fast and hard.  I struggled most days with trying not to stress.  To find balance.  Patience.  It really was all mental - I knew that but couldn't quite find my center.  Finally though I think I'm back on top and putting more energy into living intentionally."

Then I quickly moved on to the prompt for the month.  The goal was to get kind of artsy and creative with a set of cards.  To just pull out some supplies, play around and let it flow.  Then use the cards as background for a list of "I am" statements.
The "I am" statements came surprisingly quickly and easily.  Decorating the cards did too, though the process and the end result really aren't "my thing."  I find myself wanting to go back and redo them, but I'm not going to.  Not right now at least.  I think it's part of the process, to just put it out there and let it be good enough and not worry about perfection.
So I started off with 9 pieces of cardstock and a small stack of my scrapbooking supplies that hadn't been used in quite some time.  The challenge was to do things in layers - add to it as you go.  So I pulled out the Cuttlebug and embossed a few of them.  I didn't feel like using paints and I was sad that I couldn't find any of my glimmer mist - I'll have to search that out sometime, so I stuck with ink pads.  As I said, my supplies were a bit old so the ink was a bit pale and dry, but that kind of worked for this project.  On some of the cards I used the ink pad itself and just covered the whole thing, on others I just kind of smudged it up or inked around the edges.
Then I took out the stamps and embellished most of the cards before adding on a stamped "I am" on each.
Then I took my list of I am statements and just started adding them randomly to the cards using stickers, chipboard letters, stamps, or my own handwriting (ick - I want to redo those the most if only because I couldn't find my black pen and the brown one I used was the wrong color).

-I am FUN
-Creativity is messy and I am very creative (yes I may have been looking at my Pinterest quote boards shortly before working on this LOL)
-I am learning
-I am genuine
-I am loving
-I am happy
-I am making the most of my life.  Right here.  Right now.
-I am hard at work
-I am a mom

And I am not going to over-think this process or redo anything ;)  Instead I'm going to finalize this post and get to work on some more Project Life pages.

Friday, May 16, 2014

Getting Back to Scrapbooking

I really am - I'm working on getting back into scrapbooking! 
Scrapbooking is something I have enjoyed since high school, and I really do love it - the process and the results.  I am one of those people that wants to capture all the moments and hang onto them forever, and scrapbooking is as close as I can get to that.  (sometimes to the extreme - my friends laugh at me because my daughter has not one or two, but FOUR scrapbooks for the first year of her life)  So it has been driving me nuts that in my house where I essentially have two craft rooms, I haven't done any true scrapbooking since we moved in.  Craziness.
Earlier this year I decided to get in on the Project Life movement.  It strikes me as a great concept to help streamline the memory keeping process while still having the flexibility to customize everything and still make it cute and personal.  I ran across a big sale online and bought myself an album and a kit and have slowly been putting it together as I find time (and finding time is HARD isn't it?  Especially free time in large enough chunks to create and during a time of day when I have energy left for doing something other than sitting on the couch).  Ordering a few photo prints here, jotting down a few notes or funny quotes from the kids, slipping a few things in the pockets there.  Realizing that a lot of my go to supplies were old and needed to be replaced (dried up pens and ink pads - ick).  It's a process all right.  But as of today I have all of January completely put together - hooray!
Page 1:  January weeks one and two
Sometimes I don't take a lot of photos in one week so I've already decided that I'm not going to hold myself to making sure I do a 2-page layout for every week.  Some will get just a few photos, some may get 4 or more pages.
The 2014 I created myself using something I'd seen on pinterest for inspiration.  I just did a quick paint document with a blue background and added the numbers in white.  I wasn't quite on with the sizing when I printed it, so I mounted it on black cardstock.  I still prefer to do most of my journaling on the computer so I typed it up (using mostly journaling from my 365 blog, which I try to update weekly) and printed it off, then added some washi tape along the bottom.
I bought the Project Life Turquoise Edition and plan to use the 4x6 cards with the months written on them (there are several colors/patterns) as kind of a title page for each week and then add the dates using my cool new rotating date stamp thing.  (Picked it up in the impulse buy section by the registers at TJMaxx for $3 - oh yeah!).  I'm trying to keep it all cohesive and as easy to assemble as possible.

January Week 3:  

 We took a weekend trip to Myrtle Beach, during Sam's birthday no less, so this one took up more space.  I did an additional 6x12 layout to hold most of the journaling and to highlight Sam's birthday.  Here is the front of it:
and on the back side of the insert:
 I printed the journaling first directly onto an 8 1/2 x 11" sheet of cardstock, then cut it to size before adding the photos and a couple of stickers.  I almost never use stickers in my regular scrapbooking, but they seem like a good fit for this style of memory keeping.  It's been a looooong time since I've looked at anything other than patterned paper at the scrapbook store but I may have to start picking up a few embellishments, just for fun and variety.
 

 Finishing up Week 3, along with Week 4:


And that's where I am now.  I have most of February and some of March's photos printed and have started putting them into the page protectors.  It's a start.


Monday, May 12, 2014

Girl Scout Bridging Ceremony

I gave away the last of my Girl Scout supplies this week, including our "bridge" from last year's bridging ceremony.  And I was reminded at the time that I hadn't blogged about it at all!  Just goes to show how crazy busy life gets at the end of the school year.  So, while I may not be an active Girl Scout leader right now, for those of you that are and may still be looking for Bridging ideas - this is for you!

 The set up:  I like the idea of at least one good display at a ceremony and since Bridging has it's own rainbow theme I stuck with that.  The rainbow tablecloth is the ruffled plastic tablecloth from Kaitlyn's birthday party a couple years ago (I try not to keep EVERYTHING, but let's face it, crafters are hoarders ;)  )
 The posters are some the girls helped create throughout the year.  The puzzle pieces were each decorated by the girls at the beginning of the year then all joined together to show individuality and how we fit together as a group.  We added to it as new members joined.  The one on the right (green background) was part of something we did for another badge (wish I could remember which one) later in the year.  The girls did their fingerprints in ink then drew faces on them as kind of a self-portrait.  The group photos were ones we took on a troop hike.
 On top of the rainbow table were the scrapbooks the girls had worked on throughout the year.  Yep - the covers are decorated with GS Cookie boxes!
 The ceremony:
We started out as we do with all of our activities - one girl led the pledge of allegiance then another led the GS law and promise.  Then we did the presentation of all the patches and certificates for the last part of the year, plus final cookie patch/incentives presentations.

The flowers on the left were printed onto cardstock then any of the petals the daisies had earned were attached to that.  All of the other badges for the year were attached to cookie sheets (as a lot had to do with cookie season) to make for a fun display/presentation.  (I used double stick tape to attached them)
 We also called each girl up and pinned on her star and membership disc for the year.
Then it was time for the bridging.  What do you think of our bridge?  I wanted something inexpensive and easy to store so we could use it year after year.  The bases are 2x4s that I painted white and drilled holes into to hold dowels.  At the top of the dowels I attached ribbon (I used a staple gun but thumb tacks would work well too) then used the ribbon to attach the rainbow colored deco mesh that I strung between the dowels.  (One roll of deco mesh was the perfect length to cover both sides)  Total cost of the bridge (even if I hadn't had most of it on hand) was probably less than $15.
 Each girl recited the Girl Scout Promise from memory and was given her "wings" before walking across the bridge.  Most of the girls bridging were brownies moving up to juniors, but in the case of the single daisy we had bridging to brownie, she was given a silk flower (daisy of course) to carry across the bridge.  They all got their bridging patches on the other side.
 We took the time to introduce each new troop - Daisy, Brownie, and Junior and pose for group photos.  We ended our ceremony with the traditional candle ceremony (everyone stands in a circle holding a candle, the leader lights the first and then each girl lights the candle of her neighbor around the circle.  We sing the Friendship song.  Everyone makes a wish then blows out the candle.) then we could eat!

Our original plan had been to end everything with an outdoor hot dog/marshmallow roast but the weather had been really rainy so at the last minute (well, the day before) we made the call to move the ceremony inside.  As you can see, it wasn't raining during the ceremony but the ground was pretty muddy so it was a good call.
We ended up bagging up all the Smores supplies we were going to use for the fire and sending them home as individual Smores' kit party favors.

Oh - and it's not pictured but the tables we used for eating were covered in red tablecloths and had a couple of those canning jars (with a flower inside and tied with a rainbow ribbon) as centerpieces.  Simple, inexpensive, and not likely to blow away if the party had been held outside.