Menu buttons


Friday, December 31, 2010

One Little Word 2011

It's New Years Eve and time for me to declare my One Little Word for 2011. I started doing this a couple years ago after seeing the idea on Ali Edwards blog and have been surprised at the difference it makes in my life. Last year I chose the word ENJOY and with all the changes and stress we went through, the reminder was much needed at times.

Now that we are in a new house, in a completely new area far from home, and definitely not settled yet I've found myself wanting to tackle everything all at once - paint the entire house and furnish and decorate it, get the kids signed up for lessons and preschool for Ty, meet the neighbors and people in the community and make new friends, and on and on. We all know that only leads a very stressed and overwhelmed Mama. I also found myself trying to multi-task too much or only half-listening when one of my kids was trying to tell me something. So this year I chose the word

focus

I can't do everything all at once so I need to remind myself to just focus on one thing at a time and let the others go.
Focus on one room or one project.
Focus on the kids and my husband.
Focus on learning/adapting to my new environment and not comparing it (too much) to what I'm used to.
Focus on better eating and exercise habits for myself.
Focus on whatever I am doing at the current time. And be happy about it.
And also, take the term literally and work on improving my skills behind the camera.

Anyone else have a Word for the year?

Saturday, November 6, 2010

Monster Truck Party

Tyler's Monster Truck Birthday Party was so much fun!  You can now find all the photos and details reposted on the new blog here.

Friday, October 15, 2010

Hello Kitty Party

My daughter is obsessed with Hello Kitty. Obsessed. So it follows that she requested a Hello Kitty party for her 7th birthday. And, little party planner that she is, she also requested a Hello Kitty cake, and that we limbo, play pin the bow on Hello Kitty, and have a pinata. So pulling it together was pretty easy.

The invitation:

I whipped this one up in Paint, using clipart I found online.

The Food:
cupcakes with HK cake picks for school.

and for the party with her friends we had:
-cake pops! I found the idea and instructions for these on the Bakarella blog. They aren't that hard, just fairly time consuming. The key, I found was making sure the cake balls stayed practically frozen most of the time I was trying to work with them so th-ey wouldn't fall off the sticks. I also had a hard time finding some of the odds and ends to make her face so in the end I did the main features with black frosting and used small pieces of Fruit Roll-up for her bow (cut them into little rectangles and pinch the center together - it's easy!)

-chocolate covered strawberries (since I already had the candy melts all melted and sitting there) and grapes (for something "healthy")

- pink lemonade

And this Hello Kitty cake was reserved for our final cake and ice cream party with the grandparents (and other "grown-ups"). I used my good 'ole Wilton Animal Crackers pan for this one - I love how versatile that pan is.


The decor:

The favors:
I found these great little canvas bags on clearance at Michael's. 3 for 25 cents! So I just added some marabou trim and a little tag. Whenever I do pinata's I like to have bags with handles, and they need to be labelled so there are no mix-ups.
The pencils, Silly Bands, and candy were inside the pinata, of course. And I slipped the hairbows inside each bag before the party (instruction for the bows can be found here). The kids loved the bows and most put them in their hair as soon as they found them and wore them for the rest of the party.
The activities:
-pin the bow on Hello Kitty

-a dress up/open the present game. I'm sure you've played a variation of this at Christmas parties. You wrap up the prize in layer after layer of gift wrap. Then you put everyone in a circle and pass around a pair of dice. If a player rolls doubles, it's her turn to try to open the present. First she has to put on the collection of clothes (I used Kitty headband with ears that I made for Kaitlyn's Halloween costume last year, a boa, a tutu, and a pair of white dress up gloves - the gloves are the key because it makes it hard for the person to open the gift rapidly) and then hurries to rip into the present and get it open before the next person that rolls doubles can steal the clothes from her and take their turn trying to get into the prize.

-limbo

-and the pinata (you can see how I made it here)

and of course Kaitlyn and Hello Kitty got matching outfits for the occasion. She loved it.


Linking to:
The Girl Creative


Monday, August 23, 2010

Back to School: Yearly Questionaire

I think back to school traditions are great, and ones that you do the same year after year are even more fun. So this year I decided to start asking Kaitlyn (and Ty when he starts) a series of questions right before school starts and see how the answers change from year to year.

My online scrapbooking buddy, Kathryn (remember these K?!) came up with this list a couple years ago:
When will you be grown up?
What makes your family special?
What's one thing you're really good at?
What's one thing you wish you were better at?
Who is the smartest person you know?
Who is the funniest person you know?
What will you wish for on your next birthday?
What's your favorite treat?
What's your favorite game to play?
What scares you the most?
What is the best gift you've been given?
How tall do you want to be when you grow up?
What job do you want to have when you grow up?
If you could eat only one food for the rest of your life, what would it be?
If you could choose a different name what would you pick?
What rule in your house would you get rid of if you could?
If you had a million dollars, what would you buy with it?
And Kaitlyn's answers:
When will you be grown up? When I’m 20
What makes your family special? She drew a blank every time I asked this one. Then about an hour later she said "Mom do you know why our family is special? Because I love you!"
What's one thing you're really good at? Building puzzles (she says because she’s working on one while we discuss these questions)
What's one thing you wish you were better at? Everything.
Who is the smartest person you know? Me (Kaitlyn herself)
Who is the funniest person you know? Aaliyah (her neighbor friend)
What will you wish for on your next birthday? I’m not telling. It’s a surprise! (She says with a smile)
What's your favorite treat? Popsicles
What's your favorite game to play? Outside games like Capture the Kissy Boy (one they seem to have made up at the BBQ this weekend)
What scares you the most? Nothing. Well, loud thunder I’m scared. Super loud.
What is the best gift you've been given? Noboday gave me my favorite gift yet
How tall do you want to be when you grow up? As tall as my daddy
What job do you want to have when you grow up? I don’t know. There are so many things to decide from.
If you could eat only one food for the rest of your life, what would it be? Nothing
If you could choose a different name what would you pick? Hello Kitty
What rule in your house would you get rid of if you could? Tabasco sauce, I don’t like it (not that she’s ever had it! I threaten them with it when they say words I don’t like them to say)
If you had a million dollars, what would you buy with it? Everything! Everything in the whole wide world. That’s girl stuff. Hello Kitty.

Sunday, August 22, 2010

BBQ with The Girls

I have a group of friends that I've known since High School. We used to get together with once a month - I called it my Saturday with The Girls (for lack of a better name. We never did come up with a catchy one. I only mention it now because I know I've included some of our craft projects in the past so you may recognize the term). But life is crazy and those Saturdays are now more of a once-every-three-months thing. Once a year we pull the kids and husbands together with us for a BBQ - and last night was that night. I hosted, so I thought I would shared a few of the details. (because after all, I pretty much only remembered to take photos before everyone arrived and then left the camera inside and focused on chatting instead!).

If I'm going to plan anything, I always have to start with a theme, even if it's just a color scheme. I was very happy to stumble across a whole set of party printables over at DrawPilgrim (search for birthday month - she was doing a free one for every day in July) - so perfect! And not to mention inexpensive and easy! :)

For the party I did:
-pinwheels for decoration. I spray painted the cute Coke bottles from the DJ Hero Party and filled them with sand. Then attached the pinwheels to colored straws with a brad. When I found straws weren't quite sturdy enough, I threaded a bamboo skewer inside them and that worked just fine.
-used the cupcake picks on the water bottles I had printed more and put them on toothpicks but didn't end up sticking any in the food.

-printable labels so the kids could tell the drinks apart
-and I couldn't resist printing out some of these cootie catchers (remember making these in elementary school?!). The kids each got one of these before they went home and thought they were the coolest things. Mine have played with theirs most of the day today.
I really like the format we use for the BBQ every year. The host is in charge of the set up and things like plates and napkins. Everyone brings whatever meat/main dish they want for themselves and their family. Then we make food assignments for everything else. I was in charge of dessert and wanted to do something summery but also something I could make ahead of time. 
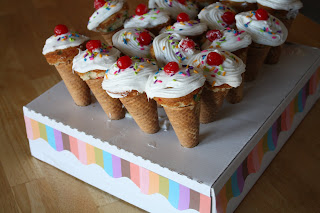
So I did a take-off on the cupcakes cooked in ice cream cones. The sugar cones are so much cuter than the other kind so I baked the cupcakes (without liners) as I normally do, then stuck them in cones. Covered them with frosting, sprinkles and added a cherry. Cute huh?
(the stand is a flat rate box from the post office that I cute holes in so the cones would stand up. I spray painted it white. And to dress it up I took a small strip from the pinwheel template, blew it up so it filled an entire sheet of paper, and cut the decorative strips from that)

*a note about the frosting - the kind I bought was too soft and started running over the side so I had to stick them in the fridge. Either remember that little trick, or buy/make stiffer frosting


Then the only other prep work I had to do was set up the tables and chairs and set out the napkins, etc. I ran across a party photo somewhere where they had all the plates, napkins, etc in a basket and thought it was really cute. Turns out is also really functional - the wind blew all the pinwheels over but the napkins in the basket stayed put without any problem. Ithas the added benefit of being easy to carry everything inside/outside as needed. I'm going to do this for all my future outdoor parties.

And a final parting shot of the kids. They only see each other once every year, so they don't know each other very well (in fact I'm pretty sure they don't even know each other's names!) and were all kind of shy and clingy at the beginning. But by the end of the evening they were all playing so nicely together and having so much fun.


(Alisha's two year old, Beau Dee's 5 year old, and Ty)

Thursday, August 12, 2010

Lunchbox Ideas

My daughter is a picky eater. And she's going to be in school all day this year. Which means we have a problem. Lunch.

Now, I know I used to have to eat whatever the caffeteria was serving that day but I'm afraid trying that would just be a waste of money in this case. And that means we're going to have to pack a lunch for her. Every. Single. Day. So we may as well make it enjoyable for both of us, right? That's why I've been keeping my eyes open for any and all ideas and products to make packing a lunchbox easier and more fun.

I outfitted her with a cute lunchbox (had to be Hello Kitty - her collection just keeps growing and growing and growing...), containers, and an ice pack (really cute flower one, that I forgot to pull out of the freezer for the photo). I was happy to find some sandwich cutters in Target's dollar section. I have a bunch of fun cookie cutters that I use on sandwiches too, but I like how the sandwich cutters are designed to cover most of the slice of bread so very little goes to waste.


Then came the collecting of ideas. First, the food. I've become a little obsessed with food the last week or so - menus, lists, how to get the entire family to eat healthier and with more variety... I even made it the focus of our Book of the Week activities - more on that when we've finished them.

My list so far looks like this:
-peanut butter sandwich
-turkey slices (rolled up on toothpicks) with crackers and cheese (if I can find a portable kind Kate likes) or a tortilla
-breasticks and sauce
-yogurt and yogurt parfait (with granola and fruit)
-bagel and cream cheese
-chili
-chicken noodle soup
-muffins
-waffles
-celery and peanut butter
-add a veggie option: snow peas, carros, cucubers and dip
-add a fruit - thank goodness she likes pretty much any fruit
-nuts/trail mix
I've been told they have access to a microwave so that may open up some options too. I would have to make up some little Cheat Sheets so that she would know how to reheat different things.
And when things get boring and I need more ideas I want to explore the myriad creative combinations for Muffin Tin Meals and Bento Boxes. Wouldn't it also be fun to do a theme once in a while? Like everything is a certain color, or they all start with "C", shapes, holidays, etc.

Any other suggestions you have had success with that I should add to the list? Please share!

I have also found a TON of cute things to slip in the lunchbox to make it a little more fun.
-notes from home. These can be as cute or as quick at you want them to be. I found some really cute printable ones here and at other sites (I could kick myself every time I use something and don't write down where I found it). Some have preprinted sayings, some you fill in yourself. And there are some adorable "fruit labels" at Skiptomylou.org with sayings like "you are the apple of my eye" that you can print on sticker paper and stick onto fruit.
-riddles and jokes
-mazes, word searches. Could even do a running game of hangman or tic-tac-toe
-cute drawings or clipart
-a photo from home (of family or maybe of the child doing something fun or silly that they will enjoy sharing with friends)
-fun napkins
-cute toothpicks - to use instead of utensils or as mini-kebabs for fruit or cold cuts
-fun muffin liners (to dress up containers for a little color), unique containers and baggies

I took some time the other day and printed out a bunch of things to get me started - notes (blank and preprinted), riddles (found these at familyfun.com), mini-quizes (found them here), games, clipart (mostly Dutin Pike freebies). I gathered a few stickers too, and stuck them all in a manila envelope that I will keep in the pantry so I can grab them once or twice a week.


So I guess we're all set. Wish me luck! :)

*Update 8/25/10
We're 2 days into the new school year and lunches are going great! Kaitlyn was so excited to pack her lunch all by herself first thing in the morning. And she ate every crumb! I was so happy!
One thing I did want to add: My best lunch idea yet was having Kate sit down and help me make up a lunch menu for the first week of school. I had her concentrate on including items from 3-4 of the food groups so that she got a good variety. And I have to say, this makes packing the lunch SO easy. Just a quick check of the list, grab everything and go. I also made sure I checked the list before shopping for groceries on Saturday so that I knew we would have everything on hand when the time came. Easy!

Tuesday, June 22, 2010

Red, White, and Blue

Just wanted to share. I had a project day on Saturday and am so happy to finally have a few 4th of July decorations. The bright colors make me happy :)

(almost all supplies are from the Wood Connection)

Linking to:


Join  us Saturdays at tatertotsandjello.com for the weekend wrap up   party!


Monday, June 21, 2010

Summer

With today being the official First Day of Summer, I thought it fitting that I finally get around to finishing up our list of things we want to do before school starts again. This has been weeks in the making. I had Kaitlyn help me start writing the list at least 2 weeks ago (those are her fingers pictured above). Then I saw this cute Summer To Do list over at Eighteen25 and knew I wanted to cutesy mine up a bit. Today I finally had the opportunity and motivation to put it all together - an entire month into summer vacation. :)

I've also decided that we need a little bit more direction, more structure in these long summer days. It so easy for time to get away from me and half the day is gone before I bother to make sure the kids get dressed (and forget about the sunscreen - eek!). Or half-way through the day we've done everything we could possibly think of and have no idea what to do with ourselves. So I came up with a plan, of sorts. This too was a long time coming, it has been on my mind since at least a couple weeks before school ended. But as with many things, it took a while to put it in motion, partially because I was wondering how much structure I would really want with my days.
Here's my plan, or rather, my list (my name is Alayna, and I am a list-a-holic;) ). I still kept it kinda vague, in order to allow for lots of freedom and flexibility. It is summer after all.
Every day I want to:
-get everyone dressed and ready for the day (including sunscreen!) by 9AM. If we are having a lazy day and I let them turn on the TV when they woke up, this is when it goes off.
-chore time is 9AM. Hopefully I will have started on my To Dos for the day by that point. Either way, this is when the kids need to make beds, clean up any toys they aren't currently playing with, do their "special chore" for the day, etc
-make sure the kids do a learning activity of some sort every day. Could be a craft, worksheets, etc. Also includes daily reading practice for Kaitlyn. (I printed off a stack of worksheets today and had them do a few this afternoon. Kaitlyn has labelled it "home school" time - which she enjoys.)
-make sure we spend some time outside (weather permitting - it's been really crazy)
-final clean up time is 7:30 PM. All toys need to be put away inside and outside. Bathtime. Then some down time with a cartoon before bed.
Every week I want to:
-take a trip to the library
-Book of the Week - select a book and use it as a mini theme for the week. I don't want this to be a huge thing, but I would like to do one craft, one physical activity/game, and one learning activity that goes along with each one. I'll lay out some of my plans for you later this week.
-picnic at the park (I think this is going to be scheduled every other week with the neighborhood)
-plan a fun family outing (from the To Do List :) )

So what's on YOUR Summer To Do List?

Thursday, June 17, 2010

Car Seat Tents


My new favorite baby gift are these cute car seat tents. I've been seeing them on all kinds of blogs lately and think I would have loved one when my little ones were tiny. And since we needed 3 (yes THREE!) gifts for this week's baby shower/card night, my friend, Dari and I whipped up our own version.


I had originally been trying to decide between these and those great nursing covers. But thought maybe just the nursing cover wasn't such a good idea - too personal, assumed that they were going to breast feed, etc. So my solution was to combine the two ideas. We made these little straps with the clips on the ends (found the clips at JoAnne's, near the buttons) that can go around your neck and hold the blanket up when you nurse. And since the blanket is already attached to the car seat, there's very little chance you'll end up out in public with nothing to cover up with. Genious, no?! ;) I love them!


And here they are all ready to go!

*Update: I didn't want to include a tutorial because there are so many great ones out there for the tents already. However since some of you wanted details I will give you a few.
-I bought 2 yards of fabric for each tent, then cut 4" off the edge. I used the 4" for the straps (one fabric for the straps on the handle, one fabric for the neck strap) and sewed the larger pieces together for the tent itself (pillow style - sew around most of 4 edges, turn it inside out then topstitch around all the edges) so the finished tent is roughly 32" x 43"
-yes, I did use velcro on the straps over the handle. The buttons are just for looks :)
-placement of the straps over the handle: I drew an imaginary line about 4" to one side of the center of the tent (because the part that goes over the feet needs to be a bit longer than the part that covers the head), then placed the straps about 6" (sorry I can't remember exactly, it's been a few weeks since I made these) apart in the center of that imaginary line.

Linking to:


SYS Thurs

Sunday, June 6, 2010

Guest Blogging over at My Insanity

About a month ago I did a guest post over at My Insanity. I thought it was time to repost it here.

...Now on to the baby stuff! In my house we're just getting past the baby stage (in fact, we just gave our crib away and got my 3 year old a "big boy bed") but I have a TON of new babies and pregnant friends in my life right now. So I've got babies on the brain right along with everyone else (though I have to say I'm liking not having to experience the nausea and sleepless nights along with them). So today I thought I'd focus on cutesy-ing up the nursery. I have a few decor ideas for you, along with a quick How To. (sorry the photos are a little dark. It's a rainy week and I didn't want Kendra to have to wait for me to find some decent sunlight)

One of the things I love most about what was once my nursery is the bead board wainscot and the little shelf above it that runs around 2 entire walls in the room. This is the one thing I really wanted when I was pregnant with my first - enough to talk my brother-in-law into installing it and my mom into painting the room since my husband was deployed at the time. The shelf was mostly intended to be decorative but it also came in handy to hold the lotion and diaper cream above the changing table, or to put small things out of reach when I found them in a tiny baby hand. Since we moved my daughter out and my son in, I haven't done much with the shelf so today is the day I change that.
I have all these fabric scraps left over from making the quilt for the bed and decided I would try modge podging them onto something. I love photos and never have enough ways to display them so I came up with the idea of making a pseudo bulletin board out of a blank canvas I've had sitting around (it's been there since the painting class I took in college - 10 years ago! I'm such a craft pack rat). I say "pseudo" because I don't think it would be a good idea to be making pin holes in the canvas.Supplies:
-canvas (mine was 16x20)
-fabric strips
-modge podge
-embellishments of any kind

I kept the canvas white because I liked the contrast, but you can, of course, paint it first if you don't want the white. Then I put down a layer of modge podge where I wanted the first strip to go and smoothed the fabric over it.

Repeat with the other strips and let dry completely. *I'm told this step is crucial with modge podge in order to avoid bubbles.

Oh! And put your supplies up high if you walk away while it's drying. I went to make my son's bed (so it would be photo ready haha) and came back to find he'd been "helping!" Luckily it was just modge podge and no real harm was done. Just a word to the wise there... :)

When it's all dry apply another layer - or two or three - of modge podge over the top of everything to seal it down. I folded then ends of the fabric strips around to the back of the canvas and stapled them down onto the frame. I figured that would keep them on better in case the modge podge didn't quite hold (modge podge and I have a love-hate relationship. I have never quite mastered it and thus don't trust it!) or if the kids got their hands on it. Plus, I ran out of modge podge :) Then I added a little rickrack embellishment and a couple photos (using double stick tape and glue dots).

See? Easy! And inexpensive. And quick. My 3 favorite things.

And here are some other ideas I thought I'd share from my kids' rooms.
We all love the vinyl lettering right? A friend of mine sells it and gave me this quote when my daughter was born. I knew I wanted to be able to move it around so I put it on a frame and backed it all with scrapbook paper.

I found these shadow boxes at the local craft store - a set of four for $5! They were unfinished so I painted them. Then I altered a wooden letter for each of the kids. This one is my son's.

For my daughter's room I added more scrapbook paper to the back. And when she came home with this cute hand print from Kindergarten (Christmas present for us) I decided the shadow box would be a good place to showcase it. Wouldn't this idea be so cute with baby feet?

Well I hope you've picked up an idea or two from me today. If you use them, I'd love to see photos.
Thank you, Kendra, for letting me take over the blog for a bit. Can't wait to see the new baby and the baby's room! ;)