Menu buttons


Thursday, April 7, 2011

Kids Art Corner

One of the things I have really been wanting to do with the playroom is create a corner where the kids and make and display their art. In the new house we no longer have a fridge full of magnets, nor do I want drawings Scotch-taped all over my newly painted walls. My daughter can churn out the art in bulk when she gets on a roll and loves nothing better than displaying them them all over the place. So I thought I'd share my solution, which I had Kaitlyn help me sweet-talk my husband into installing last night (usually I wait for the weekends and let him rest after work but these boards have been half-way finished for weeks and I couldn't stand it anymore!). I always get "please explain how you..." comments so I'll save myself the trouble of coming back later and do a quick How To while we're at it. -I bought a 1"x4"x8' board at the hardward store and cut it in half so I had two 4' sections. I asked my awesome husband to use his router on the edges to give it a bit of character. Then I stained it and added about 3 coats of poly. Then they sat in the garage for weeks. We had to buy short (1/2" long) screws so we could attach the clips to the boards. Then the boards were screwed directly into the wall. Easy peasy huh? Oh and I know the other question you will ask is "where did you get the clips?" Well, I tell ya, that was the hardest part. I had seen them used on more than one blog for different projects and had the hardest time myself even figuring out what they were called let alone where to find them. Went down lots of dead ends on this one - even Oriental Trading wasn't much help! (though they do have mini versions sometimes in their scrapbook section). So save yourself the trouble and pay attention - these little babies are called BULLDOG CLIPS and you can order them from Amazon. Costs about $6 for three dozen (so be prepared to see something else with these guys down the road as I still have more than half the box left), and if you add a couple more things to your cart you can get free shipping. As I said before, I had the hubby attach the boards to the wall in the playroom last night. Kaitlyn went right to work finding projects to hang up and assigning the upper board to herself and the lower board to her brother (because just putting things up willy-nilly just won't do!) This morning I grabbed a couple of frames and inserted a couple pieces of artwork and put my handy dandy Silhouette to work cutting out some vinyl lettering. And this, my dears, is the final result: Cross another project off the list baby! :) I have also refinished a bookshelf to hold all the art stuff, but you don't get to see that until I get it looking more like something from a Pottery Barn catalog instead of the cluttered mess it is at the moment. As always - stay tuned! :P This isn't the only small project I've been working on lately...

Linking to:
Photobucket
The Girl Creative

Sunday, March 20, 2011

It's Here!

My Silhouette machine has arrived! I know I'm gonna love it! I haven't played around with it very much yet, but I did test it out with some vinyl.

I purposely got the kids Tootsie Roll banks for the last couple of holidays so that Kaitlyn would have somewhere to put her allowance. Of course we dressed them up with some of her Hello Kitty paper and vinyl labels. She loves allowance day now, and the act of dividing her money between the three banks - and counting up how much is in her spending bank because she already has it earmarked for a new game for her DS.


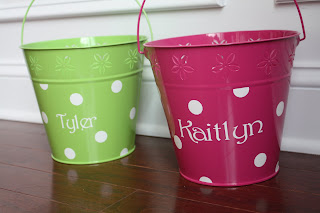
I picked up these buckets at Hobby Lobby last year after Easter. It has been my intention all along to dress them up like the ones I saw in the Pottery Barn catalog (I would totally share the link but it was LAST YEAR and they don't have anything like them this year. I did however find some similar here and here), but hadn't asked anyone to cut out the vinyl for me. Now I can do it myself!


Cute huh?! The kids love them already and are excited to see what the Easter Bunny puts in them this year.

And lastly, the requisite No Soliciting sign on the front door. Really it's a must if you live in one of the newer subdivisions - all the salesmen target them first. I've had 2 different Kirby vacuum people in the last month alone. Hope this helps cut down on that kind of thing.

Now, off I go to plot more ways to use my new toy...

Linking to:


Photobucket

Friday, March 11, 2011

Quick Sewing Projects

Since we did finally manage to get my sewing machine up and running (thank goodness for handy husbands!), I thought I'd share some of the small projects I was able to finish. First up, and really the whole reason I drug out all the sewing stuff was a car seat tent/nursing cover for my cousin. She's due in a couple weeks with her first baby and I wanted to get this in the mail to her before the little one arrived. Don't you just love that fabric?! I could very easily become a fabric junkie. It's a good thing I have very little reason to enter the fabric section very often or I'd have a whole stack of fabric with no real purpose, just because I loved the colors.

After I finished the baby gift I set to work turning these trift store sweaters into pillows for the living room sofa. I saw this idea a few months ago here and have been waiting for the chance to whip them up.

The finished product. Don't mind the lighting - it was a nasty rainy day yesterday and the colors are a bit off. The red is much prettier in person. And those pillows are oh so soft.

I also took the time to hem some of Kaitlyn's jeans, alter the top of her new swimming suit so it won't fall off her in the pool, reattach the binding to a blanket (that really should be replaced here soon - it's the one that we use in the living room and it's obviously seen better days), and glued the clips to the flower rosettes I made when I went to visit my friend Audrey 2 months ago - yikes! Now Kaitlyn has some pretty new hairbows for spring. And I can happily cross a whole bunch of little things off my To Do List!

Tuesday, February 15, 2011

Before and After - Part 3

We finished the last big push on the painting Friday - yay yay yay! I still have the living room that needs to be done, but that's on the back burner until we deal with the cords. And my parents are flying in tonight for a week's visit so I won't be wanting to paint anyway. Breathing a bit of a sigh of relief over here. It's been a long haul with the painting and I absolutely cannot wait to throw away the brushes and drop cloths!

Friday's project was the sun room. It went from this: To This!: I had an extra can of red from the dining room and not wanting it to go to waste the sun room was elected to be red. As it turns out, it didn't cover as much as we thought it would and we had to run to get one more can right in the middle of the project. Lucky for me, my husband unexpectedly had the day off, so he did the running part and I stayed in my paint clothes and rested my back, then finished it off myself when he got back (while he went out bowling with the guys - I'd be more annoyed if he hadn't just got off a stretch of 12 straight work days so I was fine with it).
Earlier in the week I had taken on double paint duty - both the playroom and the guest room, since they're connected to each other. It still only took one day, but oh what a lot of painting went into that day!
The playroom Before: (of course I didn't remember the before shots until I was partially done taping)
and After: excuse the toys. It's a playroom, they're inevitable. I know you know that, so you forgive me for not cleaning up before I took the photos, right? I'll do a beauty shot later when I get some things up on the walls.

The guest room Before:
And guest room After: We already had the headboard and the quilt, but the mattresses are new. Hope my parents enjoy them.
As you can see, we've been using the khaki color (technically it's Behr satin paint, color: Garden Wall, just in case you were wondering) on most of the rest of the rooms so the house doesn't start looking like it has multiple personality disorder. I also painted the master bathroom (khaki!), but neglected to take photos. I'm sure you'll be seeing some final photos of it once I get some of the more decorative projects done.
And with the nice weather we've been having this week, we were happy to run across a good deal on patio furniture for the screen porch. I have a feeling this area will be getting a lot of use soon.


There you have it. Hours and hours of hard work summarized in just a handful of photos. I get a lot of satisfaction out of knowing I'm almost done (almost, almost, almost!) with this stage of the settling in and will soon be showing you all lots and lots of fun projects! Enjoy the week! I'm going to see how well I do with "slowing down" for a few days and pretending I'm on vacation right along with my parents.

Friday, February 4, 2011

Picky Eating 101

I used to be the pickiest eater I knew. I have a long list of things I don't eat - some that even make me gag. And don't get near me with a cooked egg because even the smell makes me want to run away.
I no longer claim that title in my house - my 4 year old does, with his sister not far behind. They aren't the pickiest kids I know (that would be my nephews who I have only seen eat strawberries, chips, bread and dessert) and they weren't always this picky. In fact, before they each hit 18 months I used to think they were good eaters. But now we find ourselves being THOSE parents. The ones that only order corn dogs (Ty eats the "corn" but not the dog) and fries for the kids at restaurants and still spend most of the meal saying "3 more bites" or "Tyler, keep eating" over and over again. The ones that have to make 2 or even 3 meals for dinner because the kids won't eat what we eat. The ones that read every picky eating article they can find in the hope to get some new tips we haven't tried yet. The ones that let their kids eat like this:

Yup. He's eating peanut butter directly from the spoon! :) That counts as protein right?!

Bet you're wondering what prompted this train of thought. The theme for Show Us Your Life over at Kelly's Corner this week is What do you feed your kids? Perfect timing, because Sam and I have been on a mission lately to figure out a better system. We don't have a full plan yet, but I thought I would take stock of where we are right now and some of the things that are working.

When it comes down to it, the kids don't eat too much "junk." I can generally get them to go for things like yogurt and fruit instead of chips and cupcakes. Carbs are probably over-used and meats and veggies need serious work, but I think that's typical for almost anyone. The problem is that overall they eat foods but not as meals or full recipes. Their definition of a taco is a shell with only refried beans (we've lately started trying to hide some cheese and spices in the beans in the hopes their palates will adjust and start liking more flavor in things). They eat ramen noodles and chili (and even that is only one specific brand) but won't try more complicated types of soup. The other sticky point is that if something doesn't look exactly like a type of food they know they like, they won't try it. I already mentioned the chili. It's the same even with typical kid food like Mac n Cheese (Kraft type is fine, home made or anything different in a restaurant and it won't be touched) and chicken nuggets (versus chicken strips).

The high points:
-we've switched to whole grain pastas a year ago and they didn't notice the difference. And they have recently "discovered" that all shapes of pasta taste the same as spaghetti so it's ok if the noodles look different than they are used to. So I am hoping we can use the pasta as a vehicle for starting to get them to step out of their box a bit by adding different sauces or mixing in vegetables.
-Kaitlyn's absolute favorite meal is pot stickers and yakisoba noodle stir fry and Tyler will usually gobble up the stir fry too. Sadly, we can't find the yakisoba noodles at any of the grocery stores here in NC but I'm hoping we'll eventually find a good substitute. I do however take is as a good sign that the kids will eat something that is typically more a grown up taste.
-they will eat almost any kind of bread-type breakfast food - muffins, pancakes, waffles, oatmeal, etc. I have started using these as a vehicle to hide more nutritious things in, like pumpkin or zucchini. And while we usually stick to this kind of thing as a fun breakfast on the weekends, I think I might start adding in a "breakfast for dinner" once in a while.
-fruit and yogurt smoothies! Or as the kids call them, "fruit shakes." You can pretty much dump any combination of yogurt, fruit, juice, and ice in a blender and the kids slurp it up in no time. I've even tried adding spinach and got the same result. So while I've been using these as a once in a while treat, I'm thinking it would be a better idea to make them on a more regular basis and start tossing in not only the spinach but flax seed or some other nutrient-dense additives.

Quick tips for every Mom to keep up her sleeve:
-remember that any kid will eat better if it's fun. Use toothpicks or chopsticks instead of forks. Fun plates or glasses. Use cookie cutters to make sandwiches into different shapes. That kind of thing.
-dip! no matter what the food, kids usually will like it even better if they can dip it in ketchup, ranch, BBQ sauce, etc.
-the hungrier kids are, the more willing they are to try new things or eat things they don't like as well. So keep track of how close to dinner you let them have snacks (I sabotage myself with this all the time without realizing it). And if there is one food you want them to eat for sure at meal time (like veggies), give it to them first and add the rest of the meal to their plates after they've had a chance to take a few bites.

Look I was able to find some good things about my kids eating habits. Who knew?! And hopefully in a few weeks I will have more progress to report. Fingers crossed!

Tuesday, February 1, 2011

Before and After - Part 3

Anyone that bothers to read my (lame) status updates on Facebook knows that I've (still) been painting my tail off. And I know you are all (or at least two of you!) anxiously waiting to see how it's coming along.
Here is exhibit 1. Sam calls it WallZilla. To the rest of us, it's our entry. It's two-story and try as I might I couldn't get the right photo angle to show just exactly how intimidating that height is, especially above the stairs. I've been dreading tackling it. Really really dreading it. But Sunday, tackle it we did. I spent way too long at the top of a really tall ladder, super tense, painting with one hand while Sam stood at the bottom making sure it didn't slip. And I won't tell you how I managed to paint above the ledge in the staircase - I don't want you to try it at home. And the parts we couldn't reach even then? We taped a paintbrush to the end of the roller extension pole and free-handed it. Let's just say I'm glad no one can get close enough to any of it to inspect my work because it's far from perfect.
Before: (yes I forgot to grab before photos until I was partially done taping)
Entry


Stairsand upstairs hallway

After:
We used a total of 3 gallons of paint on everything. And in the end, I'm glad we did it (and saved ourselves $1000 for only one day of hard work). Paint always goes a very long way in changing the appearance of a room.

Before the entry, I had tackled the kitchen because that's where we had been testing the paint colors. Took us 3 tries, but we got one we're pretty happy with. I know it's hard to really guage it in photos but it's a khaki color - not too green, not too brown, not too dark but a decent contrast to the white trim.
Kitchen Before:

Kitchen After:

And not to be left out, the kids' bathroom got the same color paint.
Bathroom before:
Bathroom After:

By my calculations I have 5 rooms left to paint, 4 of which will be getting the same paint color. Then I can move on to the accessorizing - yay!

Laundry Drying Rack


Updated:  Sept 2015

Our laundry drying rack was originally inspired by this knock off, which we beefed up and customized.  I had been dreaming of the concept and talking it up to the husband for years, but it took a move to a new house to get him to finally put one together (in 2011).  It was funny to see how much satisfaction the husband got chopping up the old, not pretty, always-in-the-way, cheap, collapsible drying rack and reusing the dowels for the new drying rack.  We loved the drying rack, as did everyone who saw it and eventually (on a whim) I openend a shop on Etsy and we now sell quite a few of them.

I've gotten better at taking product photos too ;)  This one is our latest.

If you want to see the drying racks in action, check out our laundry room update HERE.