Menu buttons


Wednesday, June 11, 2014

4th of July Subway Art

Don't you just love it when out of the blue, not only do you get a few minutes to craft but you actually know what you want to make AND already have the supplies?  That's exactly what I lucked into this past weekend.  A friend of mine wanted a 4th of July wreath for her front door and we scheduled a little spur of the moment crafting so I could be on hand in case she needed any help putting it together (mostly that means tying the big fluffy bows :)  and saying "yes that looks great!").  I had a few orders for countdown blocks that I needed to work on, so my plan was to finish those and not really worry about other crafts.  Then I remembered I had been thinking about adding something to my 4th of July decorations that I put up a few days ago (blog post here).  In true craft-hoarder fashion I was able to dig up exactly what I needed in no time at all, including some scrap wood that was the perfect size (approx 13" x 24") - I didn't even have to sand it! A simple coat of blue paint, a few pieces of vinyl and it was all ready to go up on the wall.
The hardest part was setting up the cut files for the vinyl lettering.  It always takes a little bit of playing around to get the difference sizes and placement for subway art to look right (and I'm no expert with any of it) but I kept this one pretty simple and instead of changing fonts I just adjusted sizes and spacing.


 The husband turned out to be a big fan of this one too - yay!  (He has a soft spot for anything patriotic, I think)  It didn't take long for him to route a keyhole on the back so I could mount it on the wall.  And now I can happily move on to the Next Big Thing on the list...soon as I decide what that is ;)


Thursday, June 5, 2014

You mean it isn't Spring anymore?

Finally put away the Easter decorations yesterday.  Someone tell me I wasn't the last one to do so ;)
We don't plan to spend a lot of July at home but I love all the red white and blue so I went straight to putting up those decorations.  Actually, I put the wreath up for Memorial Day, so that makes it not early but appropriate, right?
 I do keep it fairly simple for the 4th.  Just the wreath on the door and a flag in the flowers, and a couple of touches in the living room and kitchen.

The ledge is looking a little drab though don't-ya-think?  I wasn't really intending to make any holiday crafts this month but I may need to whip up some big subway art or something to balance out the flag-thing in the wall.  As you can see, our Summer Bucket List ended up there for now but I'm thinking may move it to the console table in the living room just for fun.  Suggestions?  I still think it needs a little something to pull it together better.

Wednesday, June 4, 2014

Our Summer Bucket List

The kids are so close to getting out of school.  T-minus one week from tomorrow.  I know, I know - their school gets out a lot later than most.  Wish we could do something about it.  Then again, it did give me the opportunity today to spend some time at the pool, just me and a couple of friends and no kids.  Peaceful ;)
It occurred to me yesterday that we hadn't quite finished our traditional Summer To Do/Bucket List yet, even though we had started the list a couple weeks back when we were in the car trying to keep the kids entertained.  I took a couple minutes today to modify our list from last year and got the final thumbs up from the kiddos before printing it out and putting it in a frame.  Here is our list:

It reads:

 (   ) pool time, pool time, and more pool time    
(   ) go berry picking      
(   ) go boating      
(   )  take swimming lessons    
(   )  beach   
(   )  Tyler – try to water ski      
(   )  take lunch to Daddy at work      
(   )  roast marshmallows 
(   )  homemade rootbeer   
(   )  teach Bambi things (consistently sit, stay, etc)     
(   )   S & A - movie date night    
(   )  make ice cream
      (   )  go to a rodeo   
(   )  eat outside as often as possible    
(   )  Brag Tags      
(   )  Trip to Utah!!!    
(   )  playdates/fun with friends
(   )  watch a parade    
(   )  get grass to grow in the backyard     
(   ) ride horses     
(   )   visit farmer’s market     
(   ) library
(   ) hike Timpanogos   
(   )  try out a new restaurant    
(   )  try paddle boarding  
(   )  family fitness activities  
(   ) BBQ
(   )  family pictures    
(   )  K - read some of the BOB books from next year’s list    
(    )  K & T – learn to cook one meal   
(   )  HAVE FUN!!!

Friday, May 30, 2014

My Little Entrepreneur

 My daughter loves those stretchy band loom things.  Loves them.  Loves the process of creating, experimenting with different color combinations, trying new patterns (she was quick to figure out how to YouTube tutorials by herself) and making up new designs of her own.  She discovered very quickly, as all crafters do, that there are only so many things you can make for yourself.  And as all crafters do, she started giving her creations away as gifts.
She made a lot of things for family members for Christmas, including a gift for my mom.  And my mom, being a very enthusiastic and encouraging Grandma, wore her creations to work where the middle school students she works with were quick to admire them.  Before I knew it, Grandma was taking "orders" (I'm pretty sure she is buying them herself and giving them to the kids as rewards but I'm making a point to stand back and let Kaitlyn handle all the details on her own) and emailing them to Kaitlyn, who then made a list (haha) and got to work.
 I wonder...is it learned or does it come to her naturally? ;)  Or maybe a bit of both?
She had quite a few bracelets ready to send off with Grandma's gift for Mother's Day.  And me being, well me, I asked her if she wanted to make some tags to attach them to before sending them out.  You should have seen her face light up at the idea of making her own logo.  She immediately told me she wanted a flower on it so I Googled some flower clip art and she chose one.  It was a simple matter of letting her chose a font and inserting the "designs by Kaitlyn" wording into the center before printing a bunch out on card stock.
 Turned out cute, right?  I think she has a talent for this.

 I had to push her a bit to get her to finish up the rest of the list in time to send them out before school was finished, but she did it!
Her first foray into the business world.  I can see her as CEO of some big company somewhere, can't you? ;)

Wednesday, May 21, 2014

Surprises for the End of the School Year

**Reposted on my new blog, along with a few more fun variations of the Summer Fun in a Cup end of the year gift for teachers.  Check it out here!

Who is ready for summer?!  Last night at our first outing to our neighborhood pool for the year I was reminded again how much fun summer can be and started to get excited for those long hot days around the pool.
 I know a lot of schools are getting out next week - lucky.  My kids still have almost an entire month left but in the spirit of getting things done while I'm thinking about it (and if you're on Pinterest right now, how could not NOT be thinking about it? ;)  I see pins for teacher gifts ideas daily) I whipped up some End of the Year gifts for my kids' teachers yesterday.
 I started out with a trip to the dollar store and collected the makings for a little Summer Fun kit - daiquiri glasses, sunscreen, drink mixes, italian ice freezer pops, and qourmet-esqe chocolates.  (they're red velvet and yes I snuck one to try...yum)
 I topped them off with a cute tag, (found the inspiration and printable tag here)  a fun paper straw, and a tiny drink umbrella.
One, two, three, four - done!  The hardest part was finding the cute little umbrellas - I searched 4 or 5 stores before finally finding them at a dollar store in a different town from the one where I had found everything else.  I'm sure a party store would have had them, but I haven't been anywhere near one of those in the last couple of weeks.


While I was at it, I picked up a couple of little surprises for the kids and tied them together with some curly ribbon. I also did a quick google search for the clipart then just printed it out onto cardstock for a quick and easy tent sign.  They are now packed into a grocery bag and hidden under my craft table where I will hopefully remember to pull them out to surprise the kids with on the last day of school.

When do your kids get out of school?  Do you have any fun plans for the last day of school or vacation plans for this summer?

Monday, May 19, 2014

Pantry Re-do

Organization and reorganization - we just can't get away from it, can we?  Or maybe that's just me... 
No I'm pretty sure it's everyone ;)  When I get the chance I've been working my way down the list of places that needed decluttering that I made for the 40 Bags in 40 Days Challenge (note to self - I need to post an update on that.  The official 40 days were over a few weeks ago lol).  Yesterday I had some time to waste before heading to my daughter's dance recital and I didn't want to get started on anything big, so I decided to finally add the labels to the containers in the pantry.  
I said that word again, didn't I?  Finally.  I've had those letters cut out (vinyl lettering using the silhouette) and sitting here for weeks now.  And the pantry itself?  We put shelves in it and repainted it, oh, a year and a half ago.  I don't suppose I will ever catch up completely or totally finish the projects on my list.  And I'm ok with that.  I'm ok that it takes a while to get things done, and even longer to share them on the blog.  At least things are getting done, and progress of any sort is really the goal.  That, and having a life outside of the To Do List, which is really what life is about right?
So before another one of the kids comes downstairs needing something or the dog insists on going outside and I get interrupted again, let me share my pantry photos.
This is the Before:
The biggest issue was the wire shelving, of course.  I'm probably a closet snob now that my husband is so good with installing built-ins.  I can't stand the wire stuff anymore.  So it had to go.  As did that metal post right in the middle of the closet.  It was always getting in the way.

And let's not forget the overall clutter. 
So I emptied it all out and stacked it in the sun room - can you believe ALL that was in that one closet?! - and turned the husband loose on the shelving.
Did I mention the closet re-do was what told him I wanted for my birthday that year?  Yep.  And I painted it myself too - happy DIY birthday! ;)
At the time I had been seeing a lot of fun walls in pantries and I wanted to do something unique and fun but without putting a lot of extra time into it.  What I ended up with was a series of stripes using leftover paint from the rest of the house.
Then I was all set to load everything back in.  I started off being methodical about it.  I put the seldom-used stuff in the back two corners and assigned specific shelves to certain types of food - baking, cereal, snacks, etc.  Then I realized I was having Kaitlyn's party that weekend and needed the sunroom and I shoved the rest of it in there willy nilly.
A few months later my friend Audrey came to visit and insisted on helping me finish organizing it one afternoon.  Everything got completely sorted, categorized, tossed (if expired or didn't look like I would ever use it), and reshelved.  And that was the point it has been in for quite some time - functional but not quite fully finished enough to take final photos.
 Until yesterday.  WOOHOO!  Labels are on and the pantry is finished!
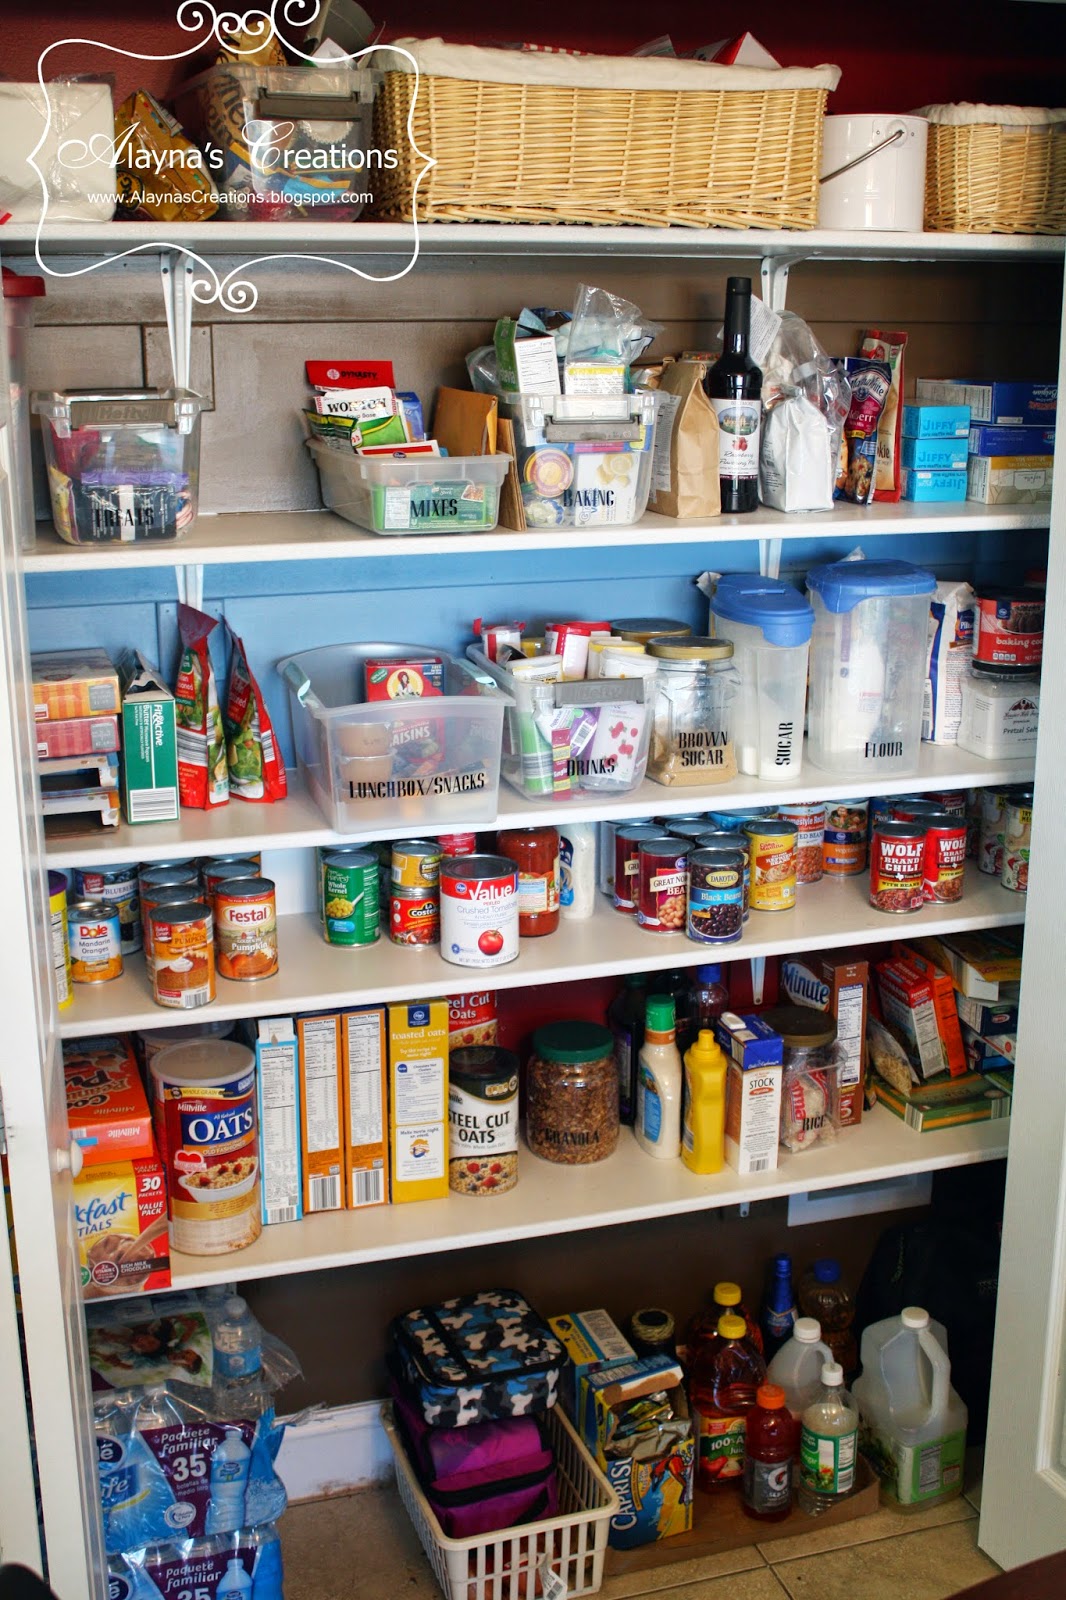
 For the containers themselves I tried to work mostly with what I had already.  The sugar and flour were some I've had forever and after going back and forth and looking at all the fun and pretty containers available in many different stores I decided to stick with clear plastic ones.  That way I can just rinse them out if anything spills and we can easily see what's inside, even without the labels.  The jars for the brown sugar, powdered sugar, rice, granola, etc are actually containers that used to hold nuts.
 I purposely had my husband build that one shelf shorter just for cans.  It's working really well for us and freed up enough space that we could fit in one more shelf than had originally been able to fit.
I want to pick up a few of those under-shelf baskets the next time I'm at Ikea for potatoes, onions, and maybe those lunchboxes.  (There's always something on the list isn't there?)

I made sure when I was organizing everything that the things the kids need to access themselves were within easy reach (cereal, snacks, lunchbox stuff, drinks) and things like chips and candy were kept up out of easy reach.  The top shelf also holds things we use for entertaining.  That white bucket with the handle is a divided container that holds plastic utensils and napkins and I always keep it stocked and ready to pull out.  The other baskets hold napkins, paper plates, straws, cupcake wrappers, etc.

And there we have it.  It's not quite Pottery Barn catalog perfect, but it looks good and it's functional.

Sunday, May 18, 2014

One Little Word - May Prompt (I am)

Thought it was time to share my One Little Word prompts for this month.  After such a crazy April I surprised myself by getting to these within the first couple days of May.  I guess what I really needed was to take the time to breath, get grounded and back in balance inside my head.
My reflections for April:
It says:  "Breathing a sigh of relief.  April was too much - work, responsibilities, Spring To Do lists, etc - all hit fast and hard.  I struggled most days with trying not to stress.  To find balance.  Patience.  It really was all mental - I knew that but couldn't quite find my center.  Finally though I think I'm back on top and putting more energy into living intentionally."

Then I quickly moved on to the prompt for the month.  The goal was to get kind of artsy and creative with a set of cards.  To just pull out some supplies, play around and let it flow.  Then use the cards as background for a list of "I am" statements.
The "I am" statements came surprisingly quickly and easily.  Decorating the cards did too, though the process and the end result really aren't "my thing."  I find myself wanting to go back and redo them, but I'm not going to.  Not right now at least.  I think it's part of the process, to just put it out there and let it be good enough and not worry about perfection.
So I started off with 9 pieces of cardstock and a small stack of my scrapbooking supplies that hadn't been used in quite some time.  The challenge was to do things in layers - add to it as you go.  So I pulled out the Cuttlebug and embossed a few of them.  I didn't feel like using paints and I was sad that I couldn't find any of my glimmer mist - I'll have to search that out sometime, so I stuck with ink pads.  As I said, my supplies were a bit old so the ink was a bit pale and dry, but that kind of worked for this project.  On some of the cards I used the ink pad itself and just covered the whole thing, on others I just kind of smudged it up or inked around the edges.
Then I took out the stamps and embellished most of the cards before adding on a stamped "I am" on each.
Then I took my list of I am statements and just started adding them randomly to the cards using stickers, chipboard letters, stamps, or my own handwriting (ick - I want to redo those the most if only because I couldn't find my black pen and the brown one I used was the wrong color).

-I am FUN
-Creativity is messy and I am very creative (yes I may have been looking at my Pinterest quote boards shortly before working on this LOL)
-I am learning
-I am genuine
-I am loving
-I am happy
-I am making the most of my life.  Right here.  Right now.
-I am hard at work
-I am a mom

And I am not going to over-think this process or redo anything ;)  Instead I'm going to finalize this post and get to work on some more Project Life pages.