Menu buttons


Showing posts with label Master Bedroom. Show all posts

Tuesday, April 15, 2014

Master Bedroom - Complete!

Guess what?!  For the first time in my adult life I have a completely pulled-together, fully decorated bedroom!  Yay!
I really only had finishing touches left - something decorative above the bed.  I had run across the unfinished wooden scroll frame (in the center) at the craft store months ago, brought it home and painted it white with the intention of putting a quote or something inside it on the wall.  Then at my last big trip to Hobby Lobby (I think my friend and I spent 90 minutes just wandering lol) I ran across these big monogram letters 50% off.
I love that they are already embellished for me and the paint even matched my room.  I did have to find and paint the "&" sign to finish it off.
I even hung everything up all by myself last weekend while the husband was working.  They're all centered and straight and everything! ;)
So here's a look at the room all put together.  The wall décor (on the right) I made a while back.
The lamps I picked up at Target a month or so ago.  And look - some of my photos are out on display!
My newly reupholstered chair and the console table Sam built.
I don't think I've shown that off yet.  The shelves were kind of an "oops" when he was building the console table for the living room.  He had the upper part all together and called me out to the garage to check it out and I had to tell him "um, honey...I didn't want the DVD player in the middle I wanted it hidden behind the shutters on the side."  We were eventually going to put something there anyway so - bonus!  I just need a couple more accessories or books on those shelves.  I'm sure I will run across the perfect thing eventually, but it doesn't detract from the room as is.

So one more time - this is the Before photo taken December 2010 when we had just purchased the house and our furniture hadn't even arrived.
And After!
 And in case you were wondering - yes, this is the ONE room in the house that stays this clean almost all the time.  I even make my bed every morning  ;)
 
Linking to:
 

Thursday, March 20, 2014

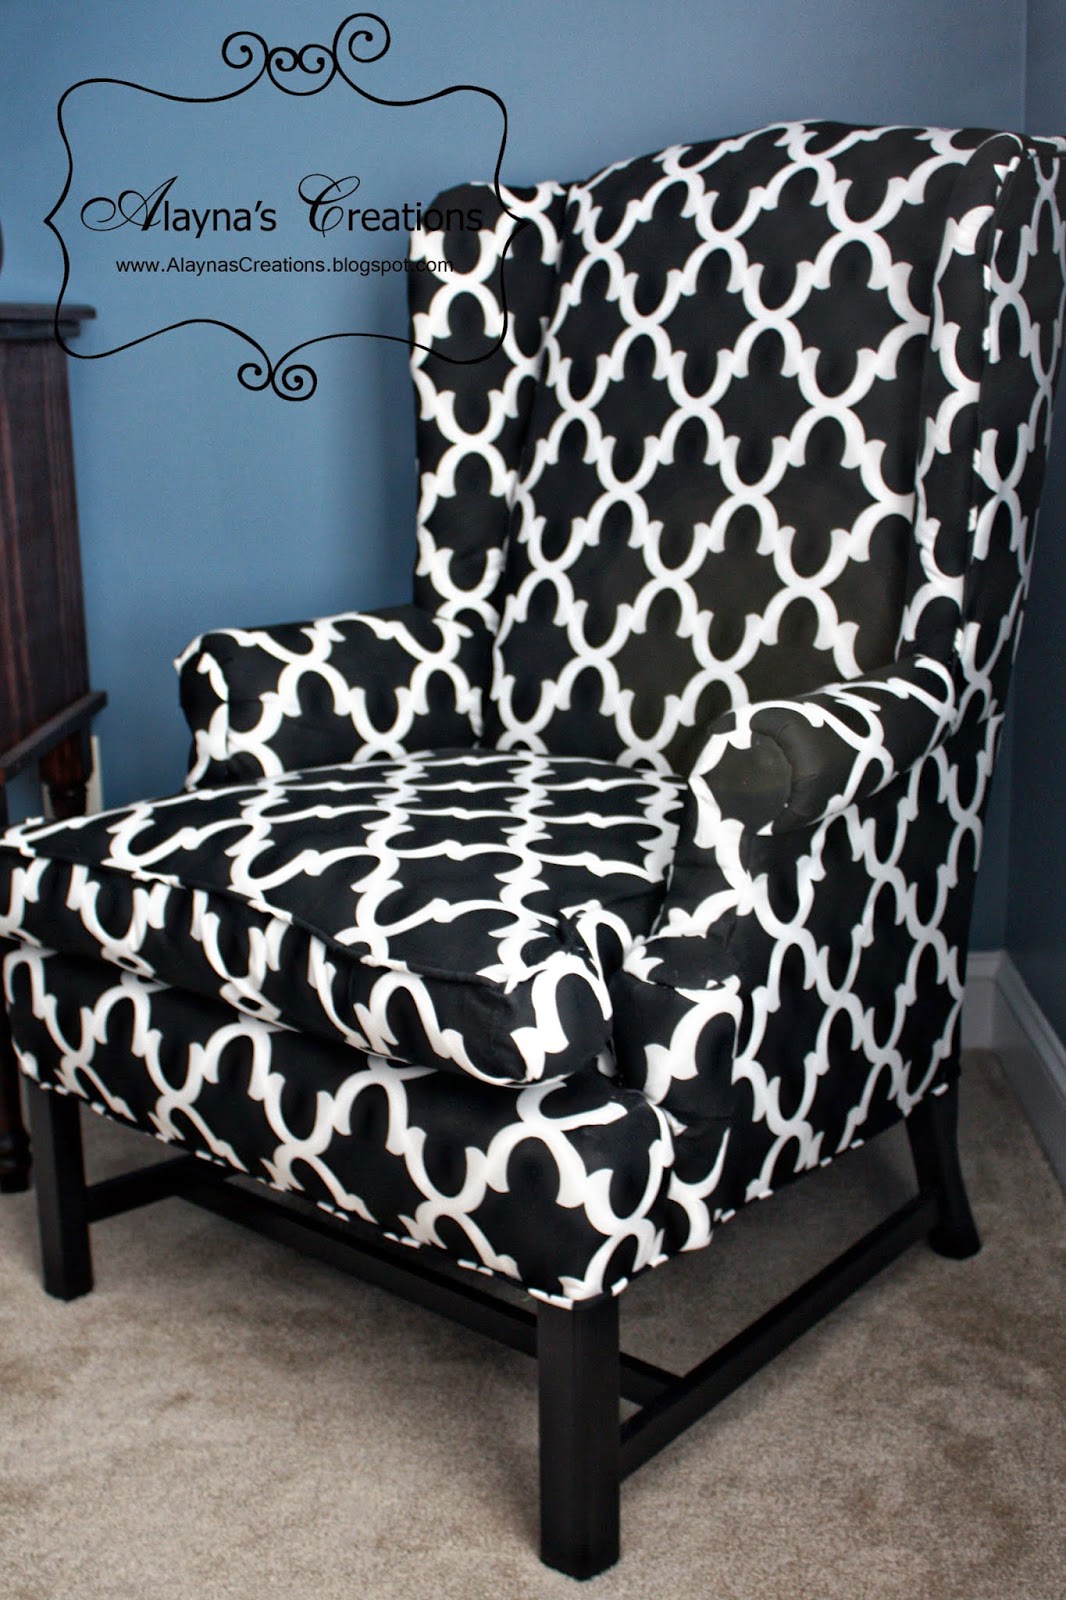
Wingback Chair Redo

I did it!  I did it!  I finally tackled my first reupholstery project and woohoo!  Success!
 I picked up this lovely chair last year (yes a whole year ago, urgh) on a shopping trip with a friend at a Habitat for Humanity Resale Store.  We completely filled the back of the SUV on that trip ahaha - more on that part later. 
This chair in particular cost a whopping $5.  Yup.  FIVE DOLLARS!  I figured at that price even if I messed it up I wouldn't feel too bad.  And it obviously needed a little TLC.
Then I started pricing upholstery fabric - yikes!  I mean, it wasn't exactly a surprise because back when I was doing design it wasn't unusual to order $125/yard fabrics for custom chairs.  But that doesn't work for my budget.  I eventually found a small discount fabric place not far from my home, but after a couple trips at different times I still hadn't found anything I loved and most were still upwards of $12/yd.  Luckily I stumbled onto a link to fabrics.com and found some great deals.  The fabric arrived a little over a week ago and it was finally time to tackle the chair.
I did a quick review of a tutorial I had found on a blog, then grabbed the pliers and dove in.

 My trusty sidekick helpfully had her nose in on the fun most of the time.

Do you know how many thousands of staples they put in one chair?  Me either but it's a LOT.  I gave my hand a break every hour or so of work in the hope that I wouldn't get blisters (I didn't!).  And eventually I had it all torn apart.
Then I happily took a trip to the craft store to get more batting, upholstery tacks, and cording to sew the piping.  And it wasn't that long (parts of two days' work) before I had it all finished!  The husband was actually pretty impressed.  He didn't think I would actually finish the project, let alone end up with a decent-looking chair.  He should know better than to doubt me, right? ;)  (He didn't admit any of this until after the chair was all put together and he had sufficiently praised my efforts lol.  So I forgave him.)

 Look!  It even looks good close up! ;)  And yes, I painted the base black before putting the fabric on.  I almost forgot to do that part LOL.  Some of my other tips? 
-Take lots and lots of photos as you pull the old fabric off.  It really helps to be able to go back and see the process in reverse, or look at a few details on how to attach the tricky pieces.
-Carefully label (number it when removed, where it went, and which side is the top!) and set aside each piece of old fabric as you remove it.  Not only will you be able to use them as patterns to cut out the new fabric, but you can also refer back to them when you are assembling the chair.
-Take your time!   This is a labor-intensive process and it takes its toll on your hands and your patience.  When my hands were cramping up or I found myself annoyed or ready to rush through a step I would stop for a few hours or the rest of the day.  The last thing I wanted was to "mess it up" and then have to see my blunder every time I looked at the chair.  So take your time and do it right (or fix it right then) as you go.
 The chair now happily resides in our bedroom.  I'm this close to having the bedroom completely pulled together.  I'll share that soon.
But for now, I'm going to enjoy the chair.

Saturday, March 8, 2014

Up on the Wall

 Remember this?  Well, I got it up on the wall!  (See Dari?! It didn't take 6 months! lol)
Where?  In the master bedroom, of course.  On that big blank wall by the bathroom.
 
I found I already had some photos printed, so I was able to make a nice little grouping on the wall.
PS - the hangers on the back of those frames drove my husband nuts when hanging them.  Not only are they each not quite placed in the same spot in the back, but the little hooks flip up and down so it was a real pain trying to get them on the wall.  We ended up with our faces pressed against the wall and a flashlight trying to see behind it to make sure we caught the hooks right.  I think it took us as long to hang these as it did to do the entire monogram photo wall in Tyler's room.
I'm starting to get excited about this room coming together.  I can count on one hand the number of projects I still want to do in the room - yay!  Next up is reupholstering a chair.  The fabric I ordered for it arrived the day before yesterday.  EEEEK!

Monday, February 24, 2014

What a Difference a Day Makes

I was able to finish up a few smaller projects over the weekend and thought I'd share this one before February is over.  I've loved the idea of displaying some of the special dates in our lives and have pinned three or four versions in the last year or so.  And in the interest of my new goal to follow through on things, when I found that good sale on frames a few weeks ago I decided to go back and get one for this project.
 
The dates are:  the day we started dating (in Disney World), the day we got engaged, our wedding date, Kaitlyn's birthday, and Tyler's birthday.
 
 I got it to this point around Valentines Day and then it sat there.  It was just a little too plain with that white background and I wasn't sure what I wanted to use for the backing.

 But I was on a roll the other day at the craft store.  Not only did I find some scrapbook paper that I think works really well in the frame, but I also got a new clock kit so I could fix the clock (that I made a few years ago) that had quick keeping the correct time.  (yay for checking things off the list!)
So there we have the finished product.  I love it!  And the husband was pretty complimentary about it too (I think guys are just as sentimental as we are, they just won't admit it).
 
 
Any bets on how long it takes me to get it up on the wall in the bedroom?? ;)

Friday, June 29, 2012

Working on the Master

I've been slowly working my way through the house, taking my time making it all pretty.   Now I have finally turned my focus to the Master Bedroom.  Trust me - it needed it!  In fact, when I think about it, I don't think our bedroom has been completely "put together" during our entire marriage.  There is always something else to spend the time and money on. 
When we first moved in we painted the walls and that was pretty much it.  We had always used my old bedroom set from high school, which was basically a queen size headboard, a dresser with a mirror on top, and a single nightstand.  When we replaced our mattresses and upgraded to a king size, the headboard of course never fit and we've been living without one for 8 years.  I used to use an old desk as the nightstand on my side of the bed but we got rid of that a while ago and since we've moved I have just had a big 'ole black spot in the space beside my side of the bed.  And being near-sighted that means I can't see the alarm clock in the middle of the night - not fun. 
We had decided we wanted a sleigh bed and when one because available (for cheap!) we did get one about a year ago.  This past Christmas I told my husband our gift to ourselves was a new set of nightstands.  It took me until February to find the ones I wanted, then another 6-8 weeks for them to arrive since, of course, they had been out of stock.  In the meantime, I had pinned quite a few decor ideas and I now have a pretty clear concept of how I want the room to look eventually.  The first step was new bedding.  I had fallen in love with this Anthro-inspired bedding (inspiration link here) and decided I would take the leap (all white bedding is SCARY isn't it??) and try to make it myself.  I lucked into finding a fantastic deal on sheet sets online ($25 for a king set!), bought two of them, and used them as fabric to make a duvet cover (figuring that is SO much easier to wash than a comforter if the white ever gets stained).  I alternated ruffled strips and solid strips until I had the size of the down comforter we had picked up at Ikea when we were in Charlotte.  Once I got it on the bed, I decided it didn't cover the bottom of the mattress well enough, so I un-picked the side seams and added in a ruffle. 
Much better.  I used the leftover fitted sheet from the second sheet set as a mattress cover for the box springs.  Then picked apart the pillow cases to make king size shams.
For colors, I've been really drawn to high contrast color schemes, especially black and white and I've been excited about building on that idea.  The walls in the room are blue, so I added in a few touches of blue on the pillows to bring it together.
This black and white chevron pillow is my favorite.  Makes me feel like I'm in on the trends, as chevron patterns are still pretty popular :)
Sewing isn't my craft of choice, and the duvet was pretty labor intensive.  The sewing projects took over the sunroom for probably a good 3-4 weeks LOL.  But it was worth it.  I love my new bedding!
Next up - accessories!  And some sort of console table under the flat screen TV the husband talked me into last weekend (it was on the best sale we'd seen, plus he hadn't decided on what he wanted for his "big" gift for Father's Day and our anniversary).  :) Linking to: