Menu buttons


Showing posts with label home decor. Show all posts

Tuesday, December 16, 2014

Time for the Tree!


It doesn't quite feel like Christmas until the decorations are up, does it?  I held off on putting up the tree until after Tyler's Minecraft party - I can only imagine what those wild and crazy kids would have done to the tree.  I have visions of a toppled tree and broken ornaments or at the very least we probably wouldn't have found all the Nerf darts before New Years!
But the day after the party, it was definitely time to pull some of the Christmas decorations out.
 All of our stuff is in a giant inaccessible stack in the garage right now so we used one of my Mom's trees and decorations.  It looked a little sparse when I first set it up but by the time we were finished with it I don't think there was a single bare branch.


 I also discovered that when it comes to decorating the tree, my Mom is a bigger perfectionist than I am.  We were all ready to call it good and she just kept going and going...


 Turned out gorgeous though, right?  I was happy I had taken the time to wrap gifts a few days before and stashed them in the closet so we would have some ready to put under the tree.
 And that, my friends, is the sum total of my decorating for this year.  We don't have much space right now and I'm happy with just the tree, and the stockings, and watching the Christmas cards slowly roll in from the mailbox so I can add them to my card collection.  I love Christmas!
Bambi does too ;)

Friday, August 22, 2014

Halloween/Thanksgiving 2x4 Craft - Double Sided!

If it weren't for other people, I don't know if I'd manage to work in time for "fun" crafting very often - especially right now when I seem to spend most of my days in the garage working on drying racks or sorting through yet another closet or stack of boxes in an effort to pare down all the STUFF before we move.  However, I get pretty cranky when all I do is "work" so a couple months ago when I was asked to put together a craft for the women's group at a local church I was pretty quick to agree.  I love introducing people to one of my favorite hobbies!
It didn't take us long to decide on an easy (and hopefully quick!) 2x4 craft for Halloween and Thanksgiving - yes, it's double sided!    The easier it is to change out holiday decor and the less space it takes up in storage, the better, right?  The front side reads "BEWARE of little Monsters" and the back side says "THANKS for little Blessings."
We ended up with almost 30 people signed up for the craft - Yay!  I'm told most of them have never done anything crafty so I've been thinking extra hard about how to have it all go as smoothly as possible.  Over the last week or so I've pulled together a kit for everyone and while I was at it I figured, hey, why not pull together a quick How To for the blog.  I haven't done one of those in a while.
In the kit they will find the wooden blocks, vinyl lettering, patterned paper cut to size, a couple pieces of ribbon (which I forgot to put in the photo!) and even a nice little reference sheet.  I took the extra time to type up the reference sheet because 1) a few of the people won't be able to make it tomorrow but still wanted to make the craft and 2) with that many people they may not be able to have the example blocks right in front of them and I wanted them to at least have photos for reference and 3) some people learn better/retain things better if they can read it instead of just listening to a quick explanation.

*For those of you that are going to ask (and I know someone is going to ask!) here is a quick run through of the sizes for the wood pieces.  You can use a 2x4 for all pieces (I got 2-3 sets out of one 2x4).  Cut out two pieces 7 1/4" high, two pieces 4 1/8" high, and two pieces 3 1/2" high.  For the base block I cut it 14" long then ran it through the table saw (or rather, my awsome husband did) so that it was 2" high.

The rest of the process is pretty easy:
-paint all sides of all wooden pieces.  (Actually I would have preferred to stain them, but the stain has to dry overnight and it really messy so I figured paint was a much better option for craft day)  It will probably take two coats.
-cut your patterned paper slightly smaller than the size of the blocks.  Adhere patterned paper with Modge Podge or similar adhesive
-apply vinyl lettering
-apply another coat of Modge Podge over the top of everything, including the sides that are only painted (this keeps the finish consistantly glossy on all sides)
-when dry, attach ribbon embellishments using wood glue or a hot glue gun.

Told you it was easy! ;)  Now for the beauty shots.


The big craft day is tomorrow!  I've already been over to help set everything up - can't wait!  I'll let you know how it goes... ;)

Linking to:
Link Party Palooza
BFF Open House Link Party

Thursday, June 5, 2014

You mean it isn't Spring anymore?

Finally put away the Easter decorations yesterday.  Someone tell me I wasn't the last one to do so ;)
We don't plan to spend a lot of July at home but I love all the red white and blue so I went straight to putting up those decorations.  Actually, I put the wreath up for Memorial Day, so that makes it not early but appropriate, right?
 I do keep it fairly simple for the 4th.  Just the wreath on the door and a flag in the flowers, and a couple of touches in the living room and kitchen.

The ledge is looking a little drab though don't-ya-think?  I wasn't really intending to make any holiday crafts this month but I may need to whip up some big subway art or something to balance out the flag-thing in the wall.  As you can see, our Summer Bucket List ended up there for now but I'm thinking may move it to the console table in the living room just for fun.  Suggestions?  I still think it needs a little something to pull it together better.

Monday, May 19, 2014

Pantry Re-do

Organization and reorganization - we just can't get away from it, can we?  Or maybe that's just me... 
No I'm pretty sure it's everyone ;)  When I get the chance I've been working my way down the list of places that needed decluttering that I made for the 40 Bags in 40 Days Challenge (note to self - I need to post an update on that.  The official 40 days were over a few weeks ago lol).  Yesterday I had some time to waste before heading to my daughter's dance recital and I didn't want to get started on anything big, so I decided to finally add the labels to the containers in the pantry.  
I said that word again, didn't I?  Finally.  I've had those letters cut out (vinyl lettering using the silhouette) and sitting here for weeks now.  And the pantry itself?  We put shelves in it and repainted it, oh, a year and a half ago.  I don't suppose I will ever catch up completely or totally finish the projects on my list.  And I'm ok with that.  I'm ok that it takes a while to get things done, and even longer to share them on the blog.  At least things are getting done, and progress of any sort is really the goal.  That, and having a life outside of the To Do List, which is really what life is about right?
So before another one of the kids comes downstairs needing something or the dog insists on going outside and I get interrupted again, let me share my pantry photos.
This is the Before:
The biggest issue was the wire shelving, of course.  I'm probably a closet snob now that my husband is so good with installing built-ins.  I can't stand the wire stuff anymore.  So it had to go.  As did that metal post right in the middle of the closet.  It was always getting in the way.

And let's not forget the overall clutter. 
So I emptied it all out and stacked it in the sun room - can you believe ALL that was in that one closet?! - and turned the husband loose on the shelving.
Did I mention the closet re-do was what told him I wanted for my birthday that year?  Yep.  And I painted it myself too - happy DIY birthday! ;)
At the time I had been seeing a lot of fun walls in pantries and I wanted to do something unique and fun but without putting a lot of extra time into it.  What I ended up with was a series of stripes using leftover paint from the rest of the house.
Then I was all set to load everything back in.  I started off being methodical about it.  I put the seldom-used stuff in the back two corners and assigned specific shelves to certain types of food - baking, cereal, snacks, etc.  Then I realized I was having Kaitlyn's party that weekend and needed the sunroom and I shoved the rest of it in there willy nilly.
A few months later my friend Audrey came to visit and insisted on helping me finish organizing it one afternoon.  Everything got completely sorted, categorized, tossed (if expired or didn't look like I would ever use it), and reshelved.  And that was the point it has been in for quite some time - functional but not quite fully finished enough to take final photos.
 Until yesterday.  WOOHOO!  Labels are on and the pantry is finished!
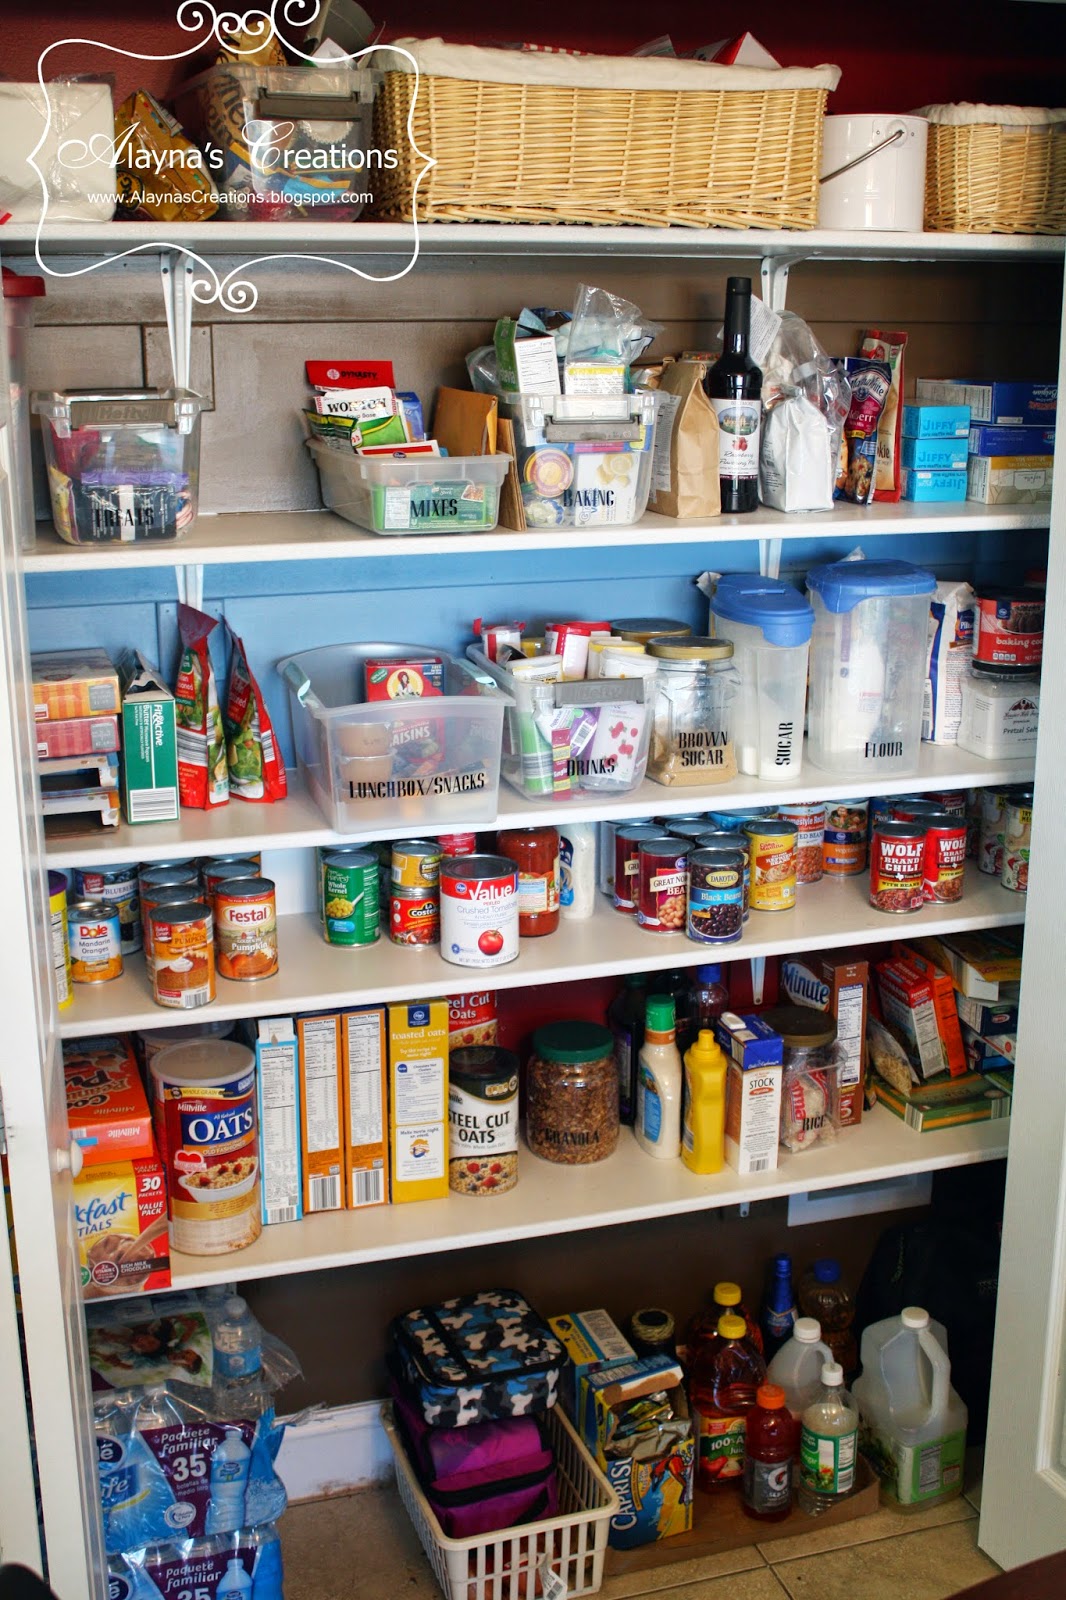
 For the containers themselves I tried to work mostly with what I had already.  The sugar and flour were some I've had forever and after going back and forth and looking at all the fun and pretty containers available in many different stores I decided to stick with clear plastic ones.  That way I can just rinse them out if anything spills and we can easily see what's inside, even without the labels.  The jars for the brown sugar, powdered sugar, rice, granola, etc are actually containers that used to hold nuts.
 I purposely had my husband build that one shelf shorter just for cans.  It's working really well for us and freed up enough space that we could fit in one more shelf than had originally been able to fit.
I want to pick up a few of those under-shelf baskets the next time I'm at Ikea for potatoes, onions, and maybe those lunchboxes.  (There's always something on the list isn't there?)

I made sure when I was organizing everything that the things the kids need to access themselves were within easy reach (cereal, snacks, lunchbox stuff, drinks) and things like chips and candy were kept up out of easy reach.  The top shelf also holds things we use for entertaining.  That white bucket with the handle is a divided container that holds plastic utensils and napkins and I always keep it stocked and ready to pull out.  The other baskets hold napkins, paper plates, straws, cupcake wrappers, etc.

And there we have it.  It's not quite Pottery Barn catalog perfect, but it looks good and it's functional.

Tuesday, April 15, 2014

Master Bedroom - Complete!

Guess what?!  For the first time in my adult life I have a completely pulled-together, fully decorated bedroom!  Yay!
I really only had finishing touches left - something decorative above the bed.  I had run across the unfinished wooden scroll frame (in the center) at the craft store months ago, brought it home and painted it white with the intention of putting a quote or something inside it on the wall.  Then at my last big trip to Hobby Lobby (I think my friend and I spent 90 minutes just wandering lol) I ran across these big monogram letters 50% off.
I love that they are already embellished for me and the paint even matched my room.  I did have to find and paint the "&" sign to finish it off.
I even hung everything up all by myself last weekend while the husband was working.  They're all centered and straight and everything! ;)
So here's a look at the room all put together.  The wall décor (on the right) I made a while back.
The lamps I picked up at Target a month or so ago.  And look - some of my photos are out on display!
My newly reupholstered chair and the console table Sam built.
I don't think I've shown that off yet.  The shelves were kind of an "oops" when he was building the console table for the living room.  He had the upper part all together and called me out to the garage to check it out and I had to tell him "um, honey...I didn't want the DVD player in the middle I wanted it hidden behind the shutters on the side."  We were eventually going to put something there anyway so - bonus!  I just need a couple more accessories or books on those shelves.  I'm sure I will run across the perfect thing eventually, but it doesn't detract from the room as is.

So one more time - this is the Before photo taken December 2010 when we had just purchased the house and our furniture hadn't even arrived.
And After!
 And in case you were wondering - yes, this is the ONE room in the house that stays this clean almost all the time.  I even make my bed every morning  ;)
 
Linking to:
 

Thursday, March 20, 2014

Wingback Chair Redo

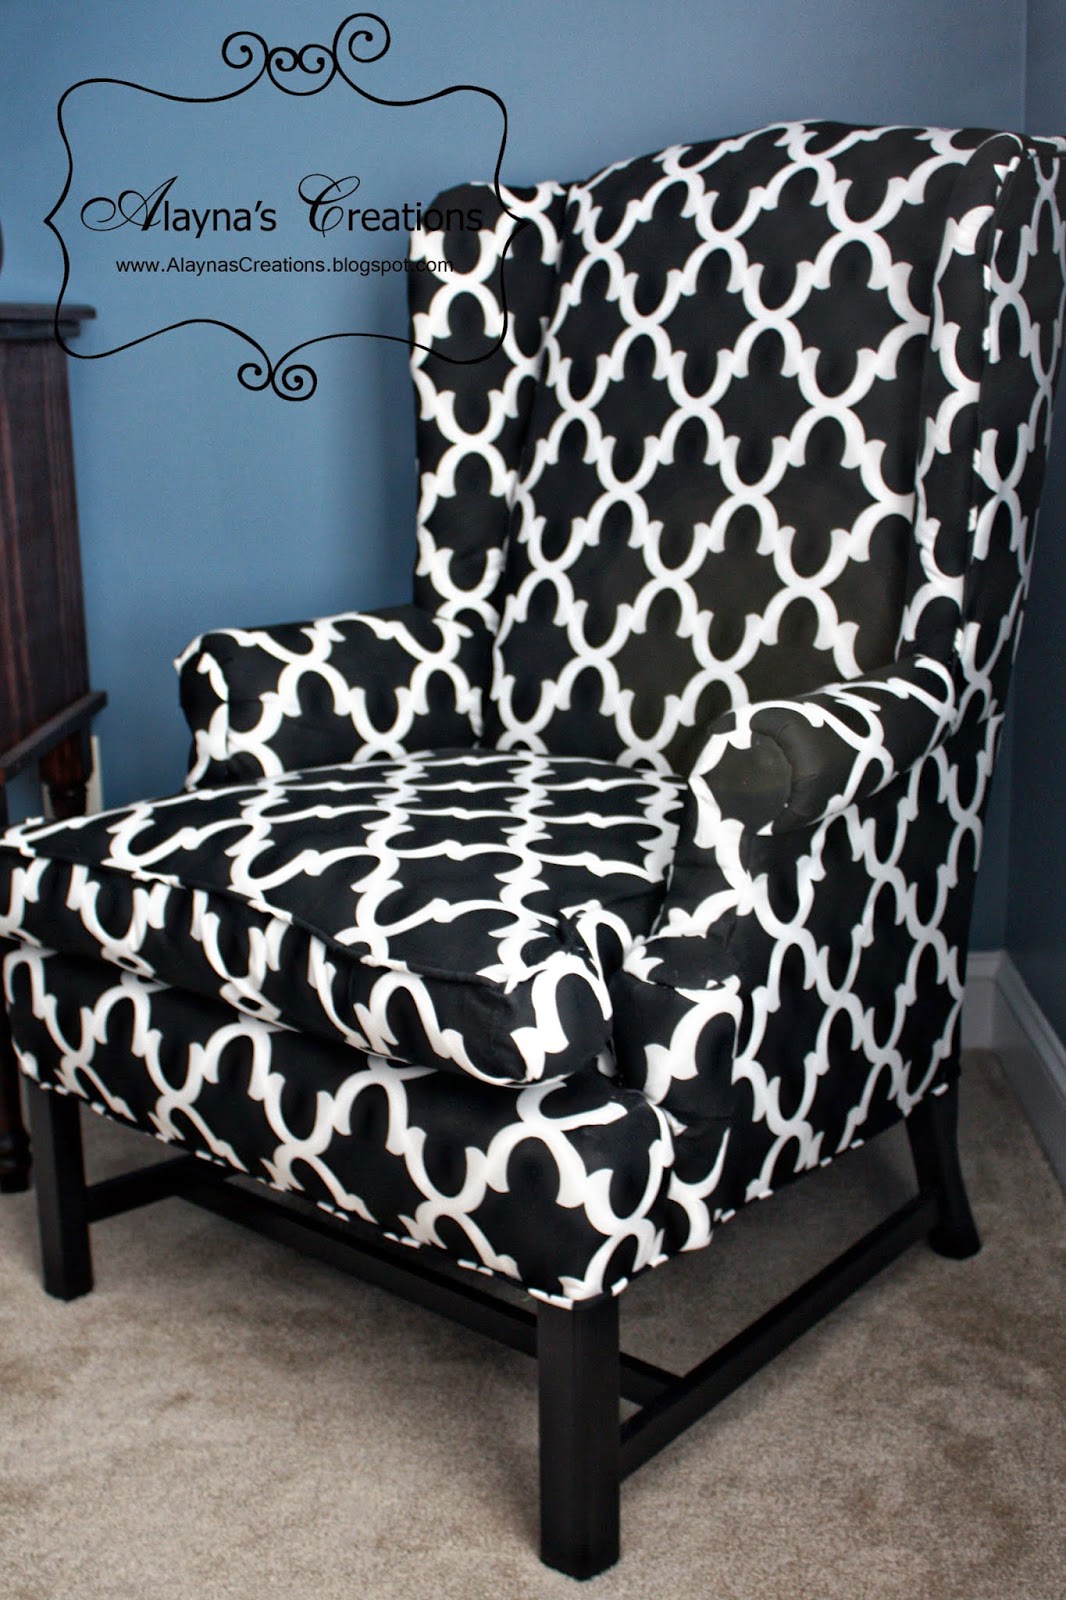
I did it!  I did it!  I finally tackled my first reupholstery project and woohoo!  Success!
 I picked up this lovely chair last year (yes a whole year ago, urgh) on a shopping trip with a friend at a Habitat for Humanity Resale Store.  We completely filled the back of the SUV on that trip ahaha - more on that part later. 
This chair in particular cost a whopping $5.  Yup.  FIVE DOLLARS!  I figured at that price even if I messed it up I wouldn't feel too bad.  And it obviously needed a little TLC.
Then I started pricing upholstery fabric - yikes!  I mean, it wasn't exactly a surprise because back when I was doing design it wasn't unusual to order $125/yard fabrics for custom chairs.  But that doesn't work for my budget.  I eventually found a small discount fabric place not far from my home, but after a couple trips at different times I still hadn't found anything I loved and most were still upwards of $12/yd.  Luckily I stumbled onto a link to fabrics.com and found some great deals.  The fabric arrived a little over a week ago and it was finally time to tackle the chair.
I did a quick review of a tutorial I had found on a blog, then grabbed the pliers and dove in.

 My trusty sidekick helpfully had her nose in on the fun most of the time.

Do you know how many thousands of staples they put in one chair?  Me either but it's a LOT.  I gave my hand a break every hour or so of work in the hope that I wouldn't get blisters (I didn't!).  And eventually I had it all torn apart.
Then I happily took a trip to the craft store to get more batting, upholstery tacks, and cording to sew the piping.  And it wasn't that long (parts of two days' work) before I had it all finished!  The husband was actually pretty impressed.  He didn't think I would actually finish the project, let alone end up with a decent-looking chair.  He should know better than to doubt me, right? ;)  (He didn't admit any of this until after the chair was all put together and he had sufficiently praised my efforts lol.  So I forgave him.)

 Look!  It even looks good close up! ;)  And yes, I painted the base black before putting the fabric on.  I almost forgot to do that part LOL.  Some of my other tips? 
-Take lots and lots of photos as you pull the old fabric off.  It really helps to be able to go back and see the process in reverse, or look at a few details on how to attach the tricky pieces.
-Carefully label (number it when removed, where it went, and which side is the top!) and set aside each piece of old fabric as you remove it.  Not only will you be able to use them as patterns to cut out the new fabric, but you can also refer back to them when you are assembling the chair.
-Take your time!   This is a labor-intensive process and it takes its toll on your hands and your patience.  When my hands were cramping up or I found myself annoyed or ready to rush through a step I would stop for a few hours or the rest of the day.  The last thing I wanted was to "mess it up" and then have to see my blunder every time I looked at the chair.  So take your time and do it right (or fix it right then) as you go.
 The chair now happily resides in our bedroom.  I'm this close to having the bedroom completely pulled together.  I'll share that soon.
But for now, I'm going to enjoy the chair.