Menu buttons


Showing posts with label tutorial. Show all posts

Saturday, April 19, 2014

DIY Corn Hole


Hi!  Thanks for visiting!  I now have a new and improved tutorial for the Corn Hole Boards up on my new blog.  Please check them out HERE.
Take a look at the new blog and see what else is new.  www.alaynascreations.co

Sunday, October 27, 2013

Pallet Pumpkins


Happy Fall!  These great pallet pumpkins are one of my favorite fall decorations for the front porch.
As the blog has switched to a new domain, I have moved this post over there as well.  Additional photos and details (and even a quick tutorial!) can now be found HERE.
Thanks for stopping by!

Tuesday, October 16, 2012

Cake Stand Tutu (31 Days: Day 16)


For today's post (day 16 and I think I've only missed one day this week!) I thought would give a closer look at the cake stand tutu I whipped up for Kaitlyn's Rainbow Dance Party.  This is something I have been wanting to create for a while and I was very excited at how well it turned out - and how easily it came together.  And let's face it - what's a Dance Party without at least one tutu?!

The hot pink stuff is actually a stretchy beanie I picked up at a consignment sale for $1.  I just cut the seam holding it together at the top, then looped the strips of tulle through the holes along the unfinished edge.

So what's holding it up?  Just a vase I had in the cupboard.  The plate holding the cake fit very nicely on the top when it was all put together.

Don't be surprised if you see this reincarnated at a later date.  I'm hoping it fits a certain little cutie that will be due for a cake smash session for her first birthday in a couple of months...
 

Thursday, October 11, 2012

2x4 Pumpkin Tutorial (31 Days: Day 11)

These little beauties are so popular I didn't want to leave them behind when I changed blog domains.  The full tutorial can now be found on my new blog HERE.  Happy Fall!  And Happy Crafting!

Tuesday, June 12, 2012

Giant Balloon Flowers

I have a quick and easy party decor tutorial for you today - mostly because I want to remember the process we figured out if I ever need it again :)
Kaitlyn's class did a very short play for part of their end of the year awards program in their classroom.  Her teacher wanted some giant flowers for the "set" (the play was about insects/collecting pollen) and Kaitlyn volunteered me to help out.  Not that I minded.  The teacher probably had no idea what she was getting herself into :)  She wanted a certain amount of flowers, 2 of each color and let me run with the rest of the plans.

Of course I recruited the husband to build the stands.  We did them completely out of scrap wood, painted them green and added big paper leaves.  That was our first installment.  We took these to the school the week before the play so the kids could practice with them. 
Then two days before the play we blew up all the balloons and I put together the flowers.  Thank goodness for husbands and power tools - the air compressor made relatively short work of this big task.

The idea I had been looking at online suggested tying the ends together to form the flower but they didn't keep their shape that way.  So I took discarded cardboard from cereal boxes, etc, cut it into circles (about 6" diameter), then cut 5 slits into the sides and slid the ends of the balloons into the slits.  I punched a hole in the center for the center balloon, then covered all the ends with tape to make sure they stayed in place.
Ta-da!  Giant three foot wide flowers made of balloons.
We carted them all to school (thank goodness I took the stands in earlier as the balloons filled the entire vehicle and I had to recruit helpers from her class to carry them all into the school) and I attached the cardboard to the stands with push pins.
Their little play was a big success.  Kaitlyn had one of the larger speaking parts and did a fantastic job as did the rest of her class.

Wednesday, February 8, 2012

My First Crochet Pattern! Ruffled Baby Legwarmers

Good morning!  I'm feeling all productive today because for the second morning in a row I manged to work out and shower (woohoo) before having to get the kids ready for school. It's amazing what you can cram into a couple of hours when the motivation and energy are flowing.

I thought I would share a crochet pattern today - my very first attempt at writing one!  I made up a set of these baby legwarmers with a matching hat a couple months ago and when I got a custom order (you can visit my etsy shop here) for them this past week I decided I'd take the time to actually sit down and write up the pattern (as opposed to my chicken scratch notes I kinda sorta remembered to take when making the originals) and let you be my ginuea pigs pattern testers, ok?  Please, please try them out for me and let me know what you think, share photos, etc.  Thanks! 

Ruffled Baby Legwarmers – **Pattern  was available for free for limited time only, and will shortly be posted for sale.  (I'll add the link for that when available)  Enjoy the photos!


Linking to:
Visit thecsiproject.com Skip To My Lou Making Monday Marvelous at CRAFT

Monday, November 21, 2011

31 Days: Day 24 - How to Make a Pinata

My son's only real request for his birthday party was a pinata. Swinging a stick at something until you bash it open to reveal fun prizes? Yeah, that sounds perfect for a 4-5 year old boy, right? Specifically, he wanted the Transformers one he spotted at Walmart. But since he party theme is Jake and the Neverland Pirates, I thought a treasure chest might be more appropriate. And since I have a hard time wanting to pay $15-20 for an empty pinata at the store, (and because it's me and I'm known for doing things the cheaper, more labor intensive way!) of course I made one myself! And since I was going to all that work anyway, I figured I'd take photos along the way and share a quick tutorial with all of you.
Here is my inspiration photo.


(photo credit)
I started out with a couple sheets of posterboard. Cardboard or foam core would work too. Whatever you have.
For the sides of the chest I cut a rectangle approx 10" wide and 8" tall, then cut off the corners to make the top wider than the bottom.


I also made 2 half circles, the diameter of each the same width as the top of the side pieces (8")Once I had the sides for quidelines, I measured the angled pieces and cut a series of rectangles for the rest of the pieces. I decided I wanted the chest 15" wide, so that is how wide all the rest of the pieces will be and the other measurement corresponds to where it fits on the chest. The width of the bottom piece matches the bottom of the side piece (approx 7"), the front and back match up with the sides on the side piece (approx 8 1/2"). I cut the top piece slightly larger than the round part of the half circles, again, at 15" wide.


I added an extra piece of posterboard (using spray adhesive) to the top piece in the center, then punched holes through both and ran a piece of yarn through it for hanging.


Now it's time to assemble! Using small tape pieces I took one side and just started adding pieces. Once the pieces were in place I went back in with larger pieces of tape and fully covered every edge with tape.Assembling the top as one piece and the bottom as another piece, then joining them together from the inside at the back and sides. I left the front open so I could stuff the pinata later.


On to the decorative part! I simply took a roll of crete paper and using spray adhesive, applied it in overlapping strips (you could also fringe the edges, but that's a whole lot more work). Once the entire thing is covered you can go back and trim the edges and put on one more strip of crepe paper to make it all clean and pretty.
Time to add the prizes!On any other pinata I would have left a small tab opening on the side to stuff the items into. As the design on this one worked better to just leave the front open and it's hard to get tape inside to adhere it as we did the other sides I fudged it a little by punching a few holes and kind of lacing the front together with yarn. You hardly notice it and could cover it up with decorative items later if it bugs you.
It was a pretty simple matter to add the lock and the trademark sword on the sides. I just free-handed something that kinda, sorta, resembled them onto some golden yellow cardstock and cut them out.And there we have it! A fully assembled treasure chest pinata in under an hour and probably less than $2 in materials (not counting prizes). Yay! Next on the list - party favors or games...


Thursday, October 20, 2011

Witchy Wreath

(I'm taking a break from my 31 days series because I really want to post this tutorial!)

T-minus 11 days and counting until Halloween! Fun fall/halloween decorating ideas are plentiful. I think I added 3 more ideas to my list just this morning! :) What I am noticing over and over again is that I'm in love with the witchy stuff - not the whole witch though, just the hats and the boots and those funny sayings ("if the broom fits..."). So I decided to make myself a wreath for my front door using just that. I also wanted to try out the mesh wreath type designs I've been seeing over and over and combined I ended up with a really fun wreath!

It was my intention to spend very little money on the project and I always love the challenge of creating the pieces myself, if possible. So I pulled it all together using a lot of things I had around the house. I pulled apart a berry wreath I had made a few years ago (that I had never really liked because it kept falling apart) so I could use the wire wreath frame. I gathered up fabric scraps and spare silk flowers. The only thing I purchased was 3 yards of purple tulle, which I split down the center to form 2 long strips.

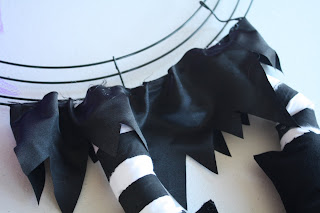
I started with the legs for the witch. Using some inexpensive white fabric, I cut a strip about 4" wide and 12" long. I wanted the witch stocking to be stripes so I used black craft paint and painted the stripes onto the white fabric. After the paint was dry I sewed the fabric together to form one long tube. (You could use hot glue for this too, if you wanted to do a completely no-sew version)


I drew a boot pattern onto some scrap paper (if I find a scanner anytime soon I'll turn it into a printable template) then used it to cut out 4 boots (2 at a time) from black felt.


I didn't want the legs to just droop lifelessly, so I hot glued a wire to the center of the boot


then used the hot glue around the edges to glue the 2 sides of each boot together, leaving the top open


Then I stuffed the boot with a little bit of cotton batting.


I cut the tube of striped fabric into two 6" long section for the legs, slid them each onto the wire and into the top of the boot, and stuffed them too. Then closed up the top opening of the the boot with the hot glue.


The hat is made out of cereal boxes. I cut one into a half circle for the hat brim (I didn't want a full circle because I wanted the hat to sit more flat once it was attached to the wreath), and formed a cone with a second cereal box. Then spray painted both of them black.

And hot glued the cone to the brim. To make it even more "realistic" I cut a jagged piece out of some scrap black satin, to use for the witch's skirt.

Now with all the pieces prepped, it was time to put it together. I used the wire to attach the legs to the bottom of the wreath form then used the hot glue to add the skirt fabric.I used small pieces of floral wire (about 5" long. You will need to clip the ends off after you attache the tulle, but it's easier to work with if the wire is a bit longer) to attach the tulle to the frame, making little poufs with the fabric as I went.


See, now the wreath is really taking shape.


As it turns out, the tulle I had wasn't quite enough to make it really pouffy and cover all the wire (I'd get 5 yards next time which would give me 10 yards total to work with next time). So I took some coordinating fabric and wrapped the wreath frame.


The only left to do was add the embellishments. On went a little sign (just a small piece of wood painted black with vinyl lettering for the quote), some flowers, a little ribbon and polka dot fabric strips.Some more ribbon as laces on her boots.


And I now have a happy little witch wreath for my front door


Linking to:
Visit thecsiproject.com
Strut your Stuff Link party at Somewhat Simple
Feature Yourself Friday at Fingerprints on the Fridge


Tip Junkie handmade projects


Home Stories A2Z