Menu buttons


Thursday, May 5, 2011

Finishing Touches - Kids' Bathroom

I finished it, I finished it! I have been sitting on the photos of most of the decor pieces for this room for weeks and weeks now, waiting for myself to get around to the last little bit so I could share it all at once. Well, today was the day I quit putting it off in favor of other things - go me!

The kids' bathroom was actually one of the easier rooms to pull together. I would just randomly run across things and think "oh that's perfect for ____!"

The first thing we did was replace the towel bar with a wall shelf and hooks. We all know it's a losing battle, trying to get the kids to hang up their towels, let alone hang them up and expect them to look good. In fact, Tyler is too small to even pretend he could hang up his own towel. I heard about the idea for using hooks for kids towels long long ago and have been so happy to finally get some myself. Then I ran across a shelf I fell in love with on the Idea Room blog.

Perfect, no? My husband actually agreed and had no problem re-creating one. Isn't he fabulous? He built this the same time he built my fantastic drying rack and it went on the wall as soon as the paint was dry. (see! told you I'd been waiting and waiting to show you!)


For those of you that are now insanely jealous and wanting one for yourself (I know you're out there because I've already had at least 2 people tell me that next time Sam builds anything he needs to just go ahead an make one for them too! :) ), it's not too complicated. We used a wide board for the back (1x10" I think), then used the length of 1x4 for the top. Added a piece of crown molding under the 1x4
and some rope trim around (smaller detail trim is harder to find than you'd think at Home Depot. This piece came from Michael's.) the bottom to dress it up a bit. And of course added the hooks (these are from Target). Then I filled in the holes and painted it all.
Of course, then I had to figure out what to put on top of the shelf. I ran across this bathroom definition printable (free - you can find one for yourself here) and thought it would be fun. So I had that printed the last time I ordered photo prints, matted it with scrapbook paper and stuck it in a frame.
I added a small floral arrangement and filled a couple of cylinder vases with the shells Kaitlyn collected at the beach last week.


And there you have it! I'm so happy with it, now that it's all pulled together. Well, I was happy with it as soon as it went on the wall too, but even more happy now! It probably needs a couple more things to fill out the shelf, but this will do until the right things find me.


For the other wall, I took these fun shots of my kids up to their necks in bubbles in my jetted tub and had them printed on canvas. Then I used my handy dandy vinyl (and Silhouette) to make a couple of flourishes to finish it off and hung it all over the toilet.


Ready for the final Before/After? Ok then.

Before:
After!


Before:
And After!


Cross another room off the list, baby! Happy Dancing now... :)


Linking to:
monogram
Photobucket
UndertheTableandDreaming
Tatertots and Jello

Wednesday, May 4, 2011

Teacher Appreciation Week

I know, I know. We're already half-way through teacher appreciation week already. Time is seriously getting away from me lately. But I did manage to throw a little something together on Monday.
Original inspiration (and instructions) for the project found here. I chose a smaller size bead organizer from Walmart and grabbed a few coordinating office supplies from the clearance section and split them in half, since I was making two (one for the main teacher, one for the assistant).

I was shopping with both kids for the candy and couldn't concentrate, or I would have made sure the wrappers were blue or green to go with my color scheme too.

The school sent home a little schedule for Teacher Appreciation week too. On Monday the kids were each supposed to bring a card for their teacher (Kaitlyn did the cutest little notes on her Hello Kitty stationary). Tuesday was chocolate day. I let Kaitlyn splurge for the really expensive candy bars. The note says "You deserve chocolate! Thanks for being such a great teacher." I'm sending the goodie boxes this morning. And tomorrow we're supposed to send a flower (which I still need to go shopping for). The note for that one says "thanks for helping me grow." What are you doing for teacher appreciation?


Friday, April 22, 2011

Finishing Touches - Powder Bath

It's a Friday. A cloudy, windy, dreary Friday. Usually on Fridays I'm either totally motivated to get tons done or I feel like goofing off all day (especially today which marks the start of Spring Break as soon as the half day of school is over) Today I'm neither - just blah. I think the people that say weather affects our moods are on the right track. So here I sit, having at least done my usual Friday morning bathroom scrubbing (thank goodness!), thinking I should be crafting but not feeling it. So what's the next best thing? Sharing one of my projects that did get finished at some point in the recent past when the motivation was flowing.


This is what I whipped up for my powder bathroom, with the help of my new best crafting buddy, my Silhouette.

It's just a piece of scrap wood that I stained. Cut out some vinyl shapes with the Silhouette (the bird comes with the machine, the cherry blossom branches were from the Silhouette online store) and applied them. Drilled a couple holes and added a ribbon. And hung it all from a hook I already had. Total out of pocket? $0! You gotta love those kinds of projects right?!


I do have to admit the idea wasn't totally original. I saw something similar on a blog, somewhere. Didn't save the link or the photo at the time but it stuck with me. So to someone out there - thanks for the inspiration!

Add a little picnic basket I had laying around to stash the toilet paper in and I declare the powder bathroom...


Done! It's the first room in the house that I can cross off the list as fully complete. Happy Dance! :)

One more time with the Before:
and After:


Linking to:
Photobucket

Friday, April 8, 2011

5 Minute (and $0!) Project

I got bored today, and fidgety. Doesn't happen often, because usually I have tons on my To Do list every day and no end of fun things to explore online or books to read when I'm not working on something. But today was one of those days where it was full steam ahead first thing in the morning then way too much goof off time later. Seriously. By 9AM I had scrubbed all 3 bathrooms and the kitchen, had a load of laundry almost finished, had updated my 365 blog, and had even showered and done my hair! Pretty much my entire list of things I wanted done today. So I watched some TV. Started a new book. Blog hopped and chatted online. And still was restless and not sure what to do with myself. (yes I know I could have done something like wash windows but it's FRIDAY. And I already spent an entire day this week cleaning carpets and upholstery so my Spring Cleaning quota was already done for the week) Then I looked at my Things to Try file and decided I should get crafty.
And this is the result: Like it? I think it's fun and totally appropriate for our house, considering the recent move. My husband just laughed when I showed it to him. And the best part? Not only did it take less than 5 minutes - including finding the right paper and printing a map from online for my pattern - but I had all the supplies on hand so it cost me NOTHING. I'm sure if you went out and bought everything, including the inexpensive 12x12 frame, you'd probably still spend less than $5-$10 on it.

*the original inspiration for this one was found on Etsy. I think they are created completely digitally and sell for something like $20 each. Sorry I don't have the actual link.

Thursday, April 7, 2011

Kids Art Corner

One of the things I have really been wanting to do with the playroom is create a corner where the kids and make and display their art. In the new house we no longer have a fridge full of magnets, nor do I want drawings Scotch-taped all over my newly painted walls. My daughter can churn out the art in bulk when she gets on a roll and loves nothing better than displaying them them all over the place. So I thought I'd share my solution, which I had Kaitlyn help me sweet-talk my husband into installing last night (usually I wait for the weekends and let him rest after work but these boards have been half-way finished for weeks and I couldn't stand it anymore!). I always get "please explain how you..." comments so I'll save myself the trouble of coming back later and do a quick How To while we're at it. -I bought a 1"x4"x8' board at the hardward store and cut it in half so I had two 4' sections. I asked my awesome husband to use his router on the edges to give it a bit of character. Then I stained it and added about 3 coats of poly. Then they sat in the garage for weeks. We had to buy short (1/2" long) screws so we could attach the clips to the boards. Then the boards were screwed directly into the wall. Easy peasy huh? Oh and I know the other question you will ask is "where did you get the clips?" Well, I tell ya, that was the hardest part. I had seen them used on more than one blog for different projects and had the hardest time myself even figuring out what they were called let alone where to find them. Went down lots of dead ends on this one - even Oriental Trading wasn't much help! (though they do have mini versions sometimes in their scrapbook section). So save yourself the trouble and pay attention - these little babies are called BULLDOG CLIPS and you can order them from Amazon. Costs about $6 for three dozen (so be prepared to see something else with these guys down the road as I still have more than half the box left), and if you add a couple more things to your cart you can get free shipping. As I said before, I had the hubby attach the boards to the wall in the playroom last night. Kaitlyn went right to work finding projects to hang up and assigning the upper board to herself and the lower board to her brother (because just putting things up willy-nilly just won't do!) This morning I grabbed a couple of frames and inserted a couple pieces of artwork and put my handy dandy Silhouette to work cutting out some vinyl lettering. And this, my dears, is the final result: Cross another project off the list baby! :) I have also refinished a bookshelf to hold all the art stuff, but you don't get to see that until I get it looking more like something from a Pottery Barn catalog instead of the cluttered mess it is at the moment. As always - stay tuned! :P This isn't the only small project I've been working on lately...

Linking to:
Photobucket
The Girl Creative

Sunday, March 20, 2011

It's Here!

My Silhouette machine has arrived! I know I'm gonna love it! I haven't played around with it very much yet, but I did test it out with some vinyl.

I purposely got the kids Tootsie Roll banks for the last couple of holidays so that Kaitlyn would have somewhere to put her allowance. Of course we dressed them up with some of her Hello Kitty paper and vinyl labels. She loves allowance day now, and the act of dividing her money between the three banks - and counting up how much is in her spending bank because she already has it earmarked for a new game for her DS.


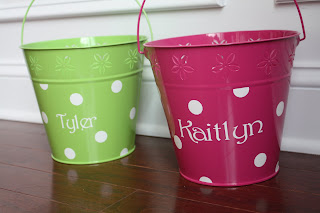
I picked up these buckets at Hobby Lobby last year after Easter. It has been my intention all along to dress them up like the ones I saw in the Pottery Barn catalog (I would totally share the link but it was LAST YEAR and they don't have anything like them this year. I did however find some similar here and here), but hadn't asked anyone to cut out the vinyl for me. Now I can do it myself!


Cute huh?! The kids love them already and are excited to see what the Easter Bunny puts in them this year.

And lastly, the requisite No Soliciting sign on the front door. Really it's a must if you live in one of the newer subdivisions - all the salesmen target them first. I've had 2 different Kirby vacuum people in the last month alone. Hope this helps cut down on that kind of thing.

Now, off I go to plot more ways to use my new toy...

Linking to:


Photobucket

Friday, March 11, 2011

Quick Sewing Projects

Since we did finally manage to get my sewing machine up and running (thank goodness for handy husbands!), I thought I'd share some of the small projects I was able to finish. First up, and really the whole reason I drug out all the sewing stuff was a car seat tent/nursing cover for my cousin. She's due in a couple weeks with her first baby and I wanted to get this in the mail to her before the little one arrived. Don't you just love that fabric?! I could very easily become a fabric junkie. It's a good thing I have very little reason to enter the fabric section very often or I'd have a whole stack of fabric with no real purpose, just because I loved the colors.

After I finished the baby gift I set to work turning these trift store sweaters into pillows for the living room sofa. I saw this idea a few months ago here and have been waiting for the chance to whip them up.

The finished product. Don't mind the lighting - it was a nasty rainy day yesterday and the colors are a bit off. The red is much prettier in person. And those pillows are oh so soft.

I also took the time to hem some of Kaitlyn's jeans, alter the top of her new swimming suit so it won't fall off her in the pool, reattach the binding to a blanket (that really should be replaced here soon - it's the one that we use in the living room and it's obviously seen better days), and glued the clips to the flower rosettes I made when I went to visit my friend Audrey 2 months ago - yikes! Now Kaitlyn has some pretty new hairbows for spring. And I can happily cross a whole bunch of little things off my To Do List!